Contents
- Introduction
- Infoblox VM remote setup
- Self signed cert based trust with DNAC
- InfoBLox DNAC integration
- DNAC passed info and extensible attributes
- DNAC passed info using LAN automation or lack there of
- Views DHCP and DNS with DNAC
- Infoblox with ISE PXG
- DNAC does not push ranges or gateway info to infoblox
- Import IPAM pools into DNAC
- Deleting pools in DNAC at the site and global level
- Summary
Introduction
9th Feb 2023
DNAC can integrate with IP address managers to allow it to pull down DHCP pools, and also create pools that will be pushed to the IPAM.
If you peruse google you will find documentation about this, which this post will not try to overlap. Instead ill look to use this to supple augmented information that i have uncovered during testing and deployments.
This lab uses NIOS 8.4.4 and DNAC 2.3.3.4
Infoblox VM remote setup
If you have a VM in a lab and you want to test it over and over here are the setup/reset notes.
- Open terminal/KVM of the IPAM
- Default login admin:infoblox
- run command
set network- the device will re-boot)
- run command
set remote_console- this will enable ssh access
- run command
set temp_license- this allows a 90 day eval, where you want 2 (15 if you need IFB to make API calls)
- For 8.4 you need networking insight license for PXGrid with ISE (IIR)
  1. DNSone (DNS, DHCP)
  2. DNSone with Grid (DNS, DHCP, Grid)
  3. Network Services for Voice (DHCP, Grid)
  4. Add NIOS License
  5. Add DNS Server license
  6. Add DHCP Server license
  7. Add Grid license
  8. Add Microsoft management license
  9. Add Multi-Grid Management license
 10. Add Query Redirection license
 11. Add Response Policy Zones license
 12. Add FireEye license
 13. Add DNS Traffic Control license
 14. Add Cloud Network Automation license
 15. Add Security Ecosystem license
 16. Add Threat Analytics license
 17. Add Flex Grid Activation license
 18. Add Flex Grid Activation for Managed Services license
- run
show license#to see whats running - Login GUI and run though GM setup & change password in the process.
- run
reset all licenses- This wipes the config and you can restart the Eval
- You will need console back in as you loose SSH access
IF you make a backup (grid->grid manager->backup), wipe, then restore you do not loose any data (inc certs)!!!
Self signed cert based trust with DNAC
From DNAC use openssl to glean the cert (or download it from IFB directly)
openssl s_client -showcerts -connect Infoblox-IP:443
Take the cert between —–BEGIN CERTIFICATE—– and —–END CERTIFICATE—– and save as .pem
On DNAC, go to System > Settings > Trust & Privacy > Trustpool, click Import, and upload the certificate (.pem file)
CSR for infoblox and DNAC trust
If its a PKI signed cert, you just need to add the root cert (and any intermediate certs)
- Upload the CA’s cert
grid, GM, members, certs, maange CA, upload - Create CSR
grid, GM, tick the members, certs, https cert, create CSR - Take the cert off to get it signed by the CA
- add signed cert
grid, GM, tick the members, certs, https cert, upload
To get this integration to work with a common PKI, I needed to use DNS name in the cert for the IPAM. This needed to resolve correctly from DNAC as well as importing the root CA’s public cert into DNAC, where IFB had a cert by this root CA.
Also needed to add “OCSP responder” info to the cert. https://www.cisco.com/c/en/us/td/docs/cloud-systems-management/network-automation-and-management/dna-center/2-1-2/release_notes/b_cisco_dna_center_rn_2_1_2.html
InfoBLox DNAC integration
On DNAC under (system -> settings -> IP Address Manage) add IPAM info:
- If you create an IP pool on DNAC it is pushed IB,
- If you create a Pool on IB, you need to retrieve it from IB as its not pushed dynamically.
-
This means all the IB pools are not on DNAC which is good.
- If you create a pool on IB but don’t sync to DNAC, if you try to also create this or later on DNAC it will error.
- But if you create a smaller subnet, IB will see this as a sub pool and reserve address space accordingly.
Heres what our Infoblox integration screen looks like on DNAC:
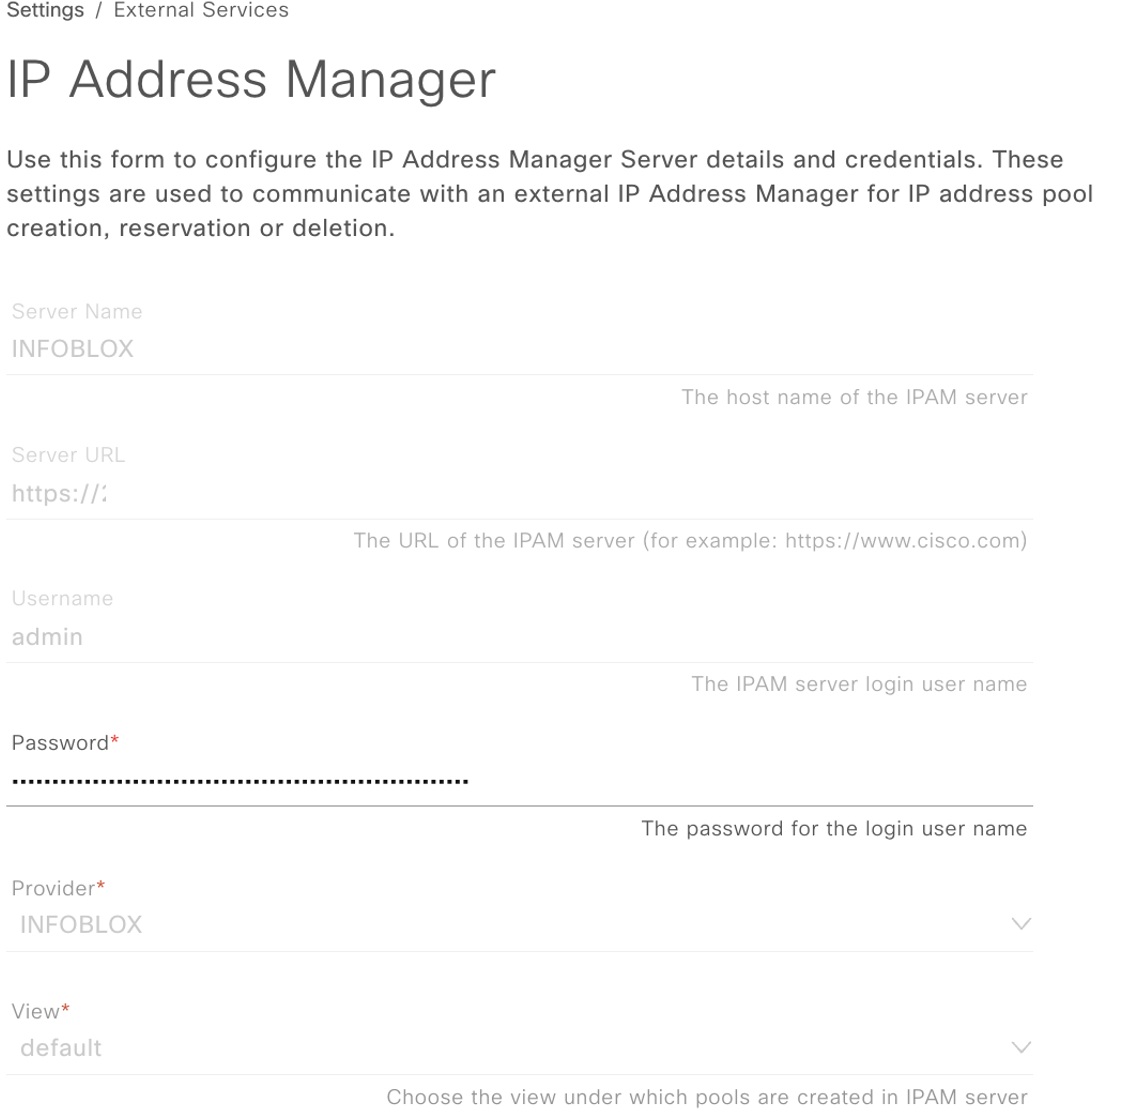
Note some limitations per this doc
- You cant integrate infoblox as IPAM if you have existing pools in DNAC
- you import the infoblox pools, but it’s not automation, and there are limitations of ;
- The IP Pool needs to be “empty”. Ie. No scope or current reservations.
- DNAC will push to infoblox, When you create a New IP Pool or New Reservation, the Cisco DNA Center updates the IPAM
- almost impossible to remove IPAM, if you decide to now continue without IPAM Integration on DNAC
DNAC passed info and extensible attributes
Prior to integration with DNAC I deleted all the ‘extensible attributes’ that i could from the IPAM, so any new ones that appear would be from DNAC, there were no ip pools or containers in infoblox & have a bunch of IP pools configured in DNAC
Default attributes
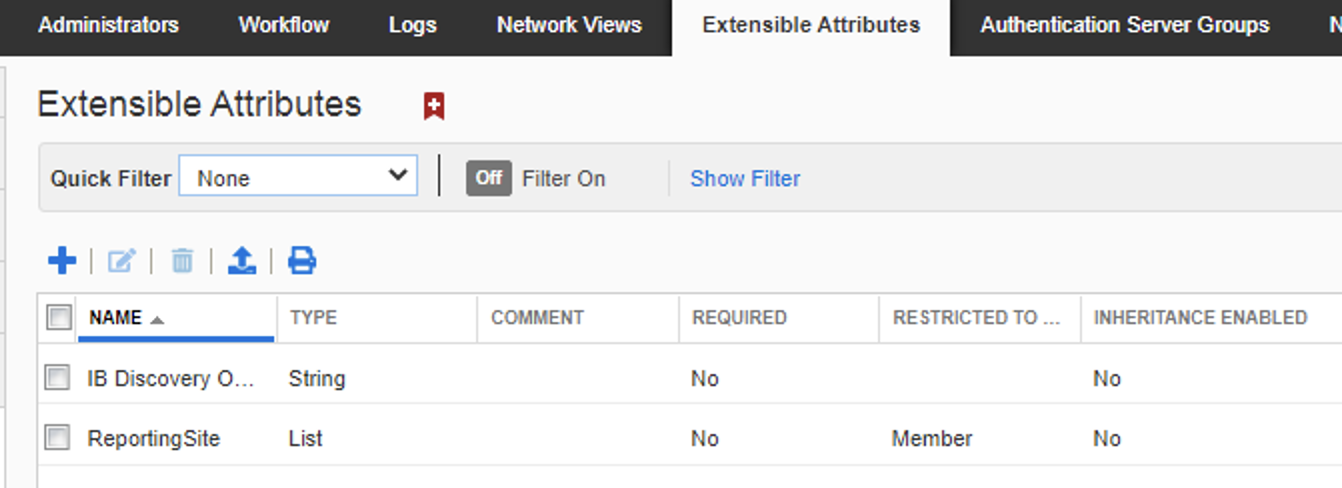
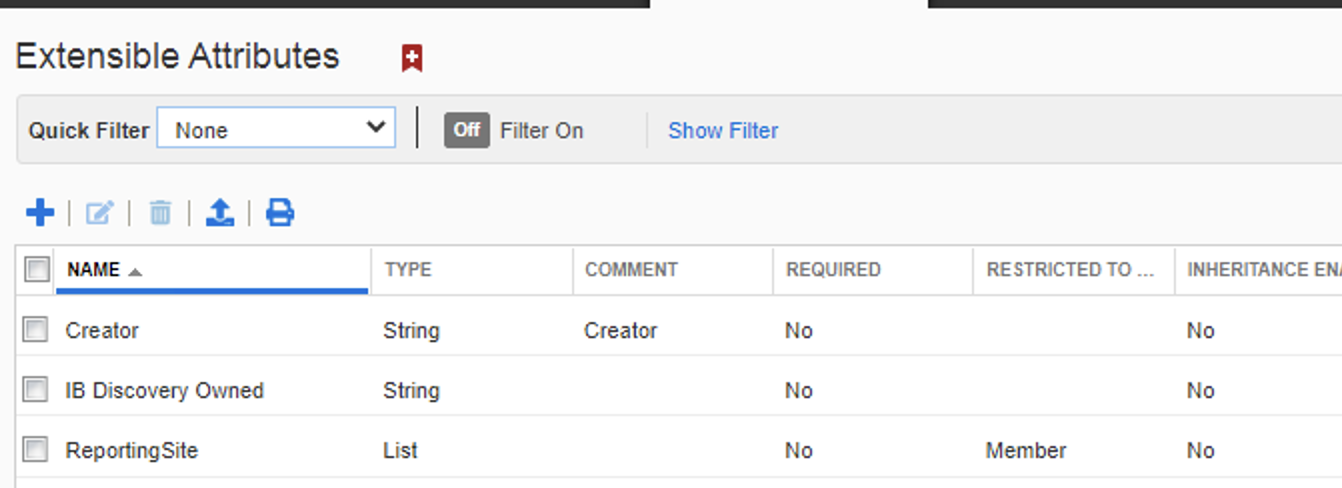
After we integrated DNAC and push a pool, we can see the one attribute it used creator.
Attributes after intergration
On the IPAM we created two ‘extensible attribute’ of ORG that allowed inheritance and HONE that did not have inheritance via (IPAM->Admin->Extensible attributes->(+))
We then created a container of 203.0.113.192/26 with the two extensible attributes (IPAM->Data Management->IPAM->(+))
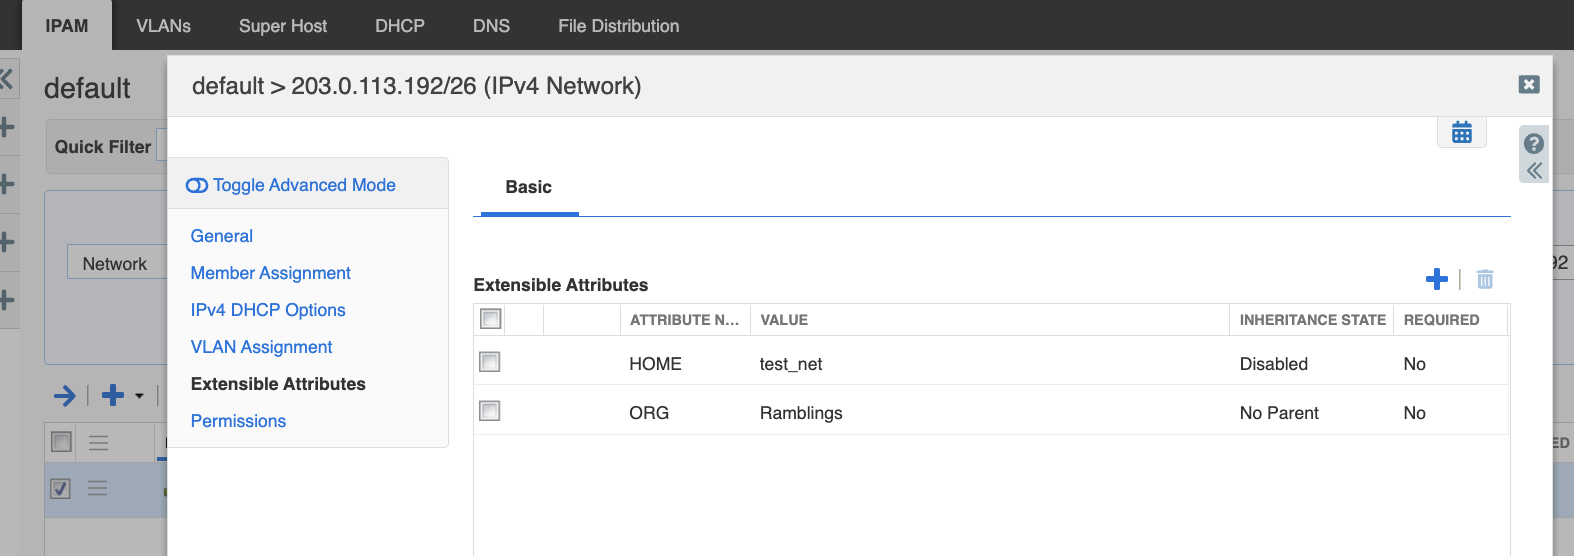
This was then imported into DNAC at the global level.
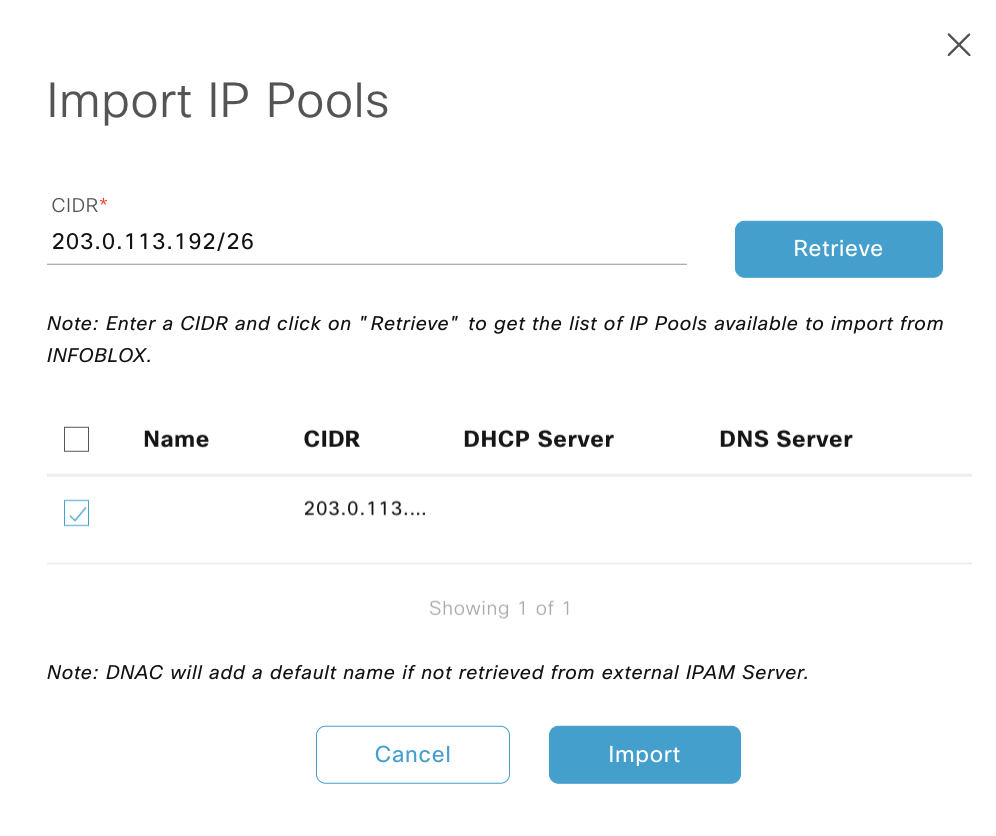
If there is no name for the pool on infoblox (which uses the comment field) the import names the pool as the subnet,so I renamed it to RAMBLINGS_POOL, which pushed this to the IPAM as a comment, note tehj following:
- IFB not expose name attribute, the comment field in IFB is populated by the IP pool name during sync.
- IFB pool import, only 50 chars of the comment field are used, spaces are changed to _
- if IP pool is updated for an imported pool, the comments are overwritten and the new name is reflected.
Note: If you delete the pool in DNAC, it will delete it on infoblox also
From this container we created a sub-pool at the site level per:
- Subnet = 203.0.113.224/27
- Gateway = 203.0.113.225
- DHCP/DNS = IPAM IP
- Name = SUB_RAMBLER_POOL
- Site = Global/EARTH2.0/Virtual_UK
This pool was then pushed back to IFB as a DHCP pool. We can see that it inherits the attributes that were set in the container (that allowed inheritance), excluded the ones that did not & added the DNAC attribute of Creator = CISCO-DNACenter.
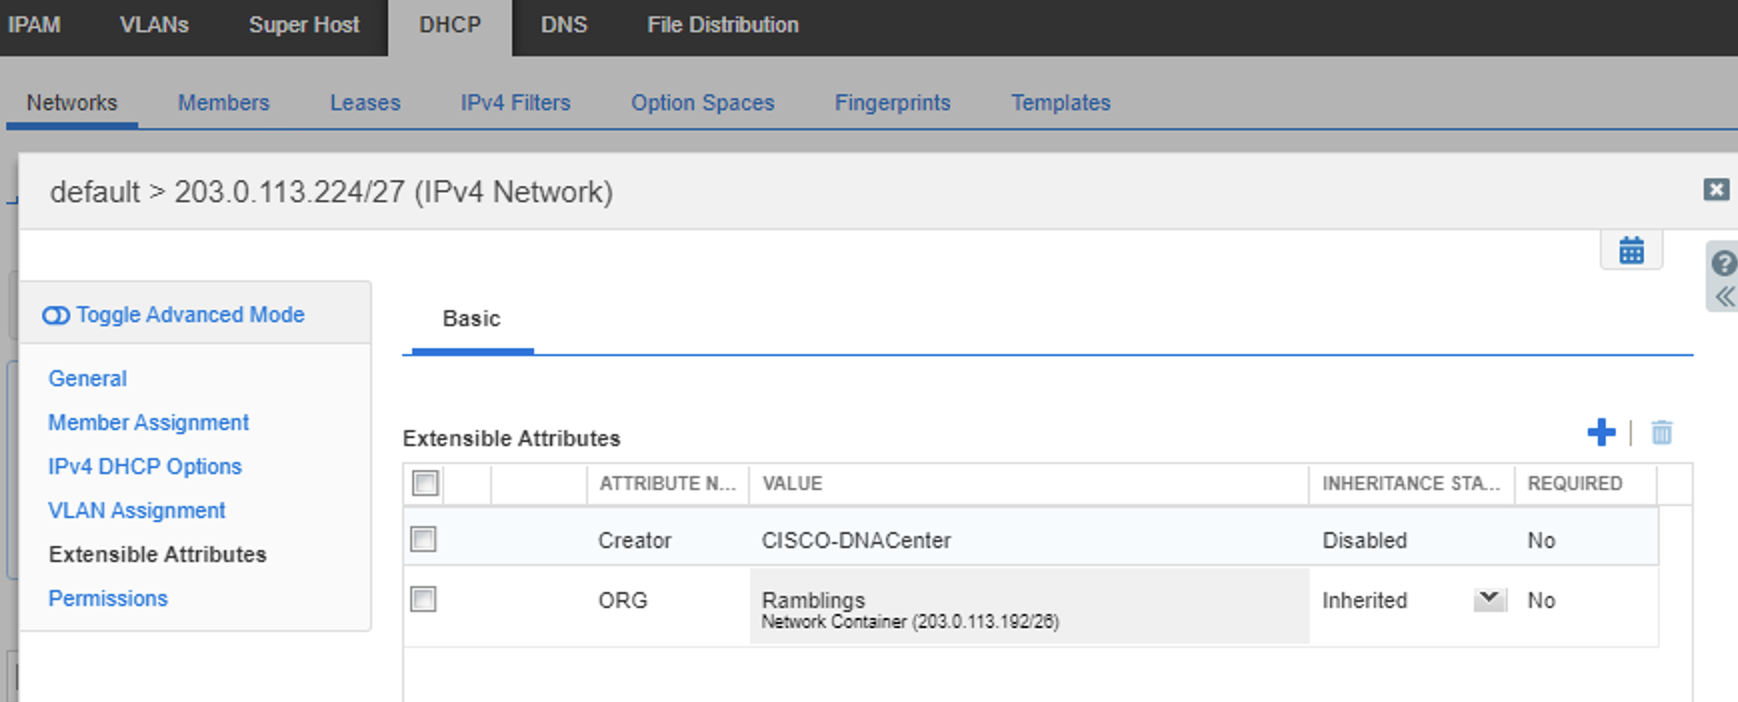
If we go back and check the ‘extensible attributes’ in infoblox, noting we should thus far have:
- IB discovery = Default
- ReportingSite = Default
- Home = We created and disabled inheritance
- ORG = We created and enabled inheritance
- Creator = DNAC pushed attribute we see in the new pool
Which we do, so theres no other attributes pushed at this stage, which makes it a challenge for smart folder structures.
I have a simple structure setup, which is rooted at the ORG and sub-grouped by the Creator
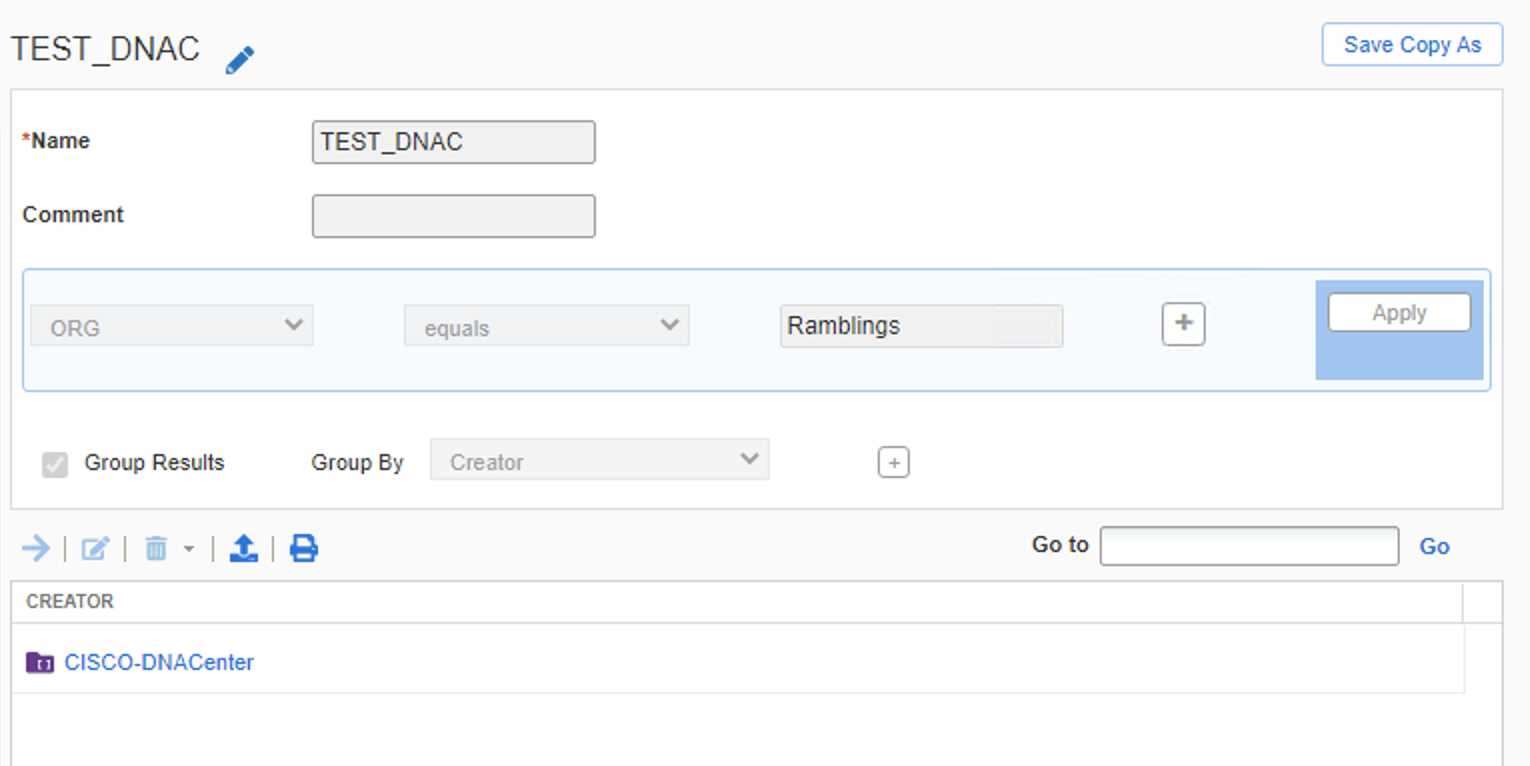
Attribute conclusion
Thus far we see only one attribute pushed from DNAC towards the IPAM, so if you are looking to leverage this data as part of your smart folder structure, it would be wise to reply on container inheritance.
My view is that one of the following approached is use, noting the use of IP pools are ‘as of writing’ used for SDA, where SDA does not associate a IP pool with a device, its over a suite of devices at a site level. So that granularity of device level is not needed for this particular problem (see later blurb on LAN automation.
-
Create all the site super-net containers in Infoblox with the attributes that places them in the correct smart-folder location, such as site. Then any sub-pools DNAC created will inherit these and they will be grouped correctly.
-
Create all your IP pools and sub-pools in infoblox, then import them into DNAC as needed. I’d suggest an API approach for this.
DNAC passed info using LAN automation or lack there of
Continuing on the the previous sub-section rhetoric.
We have a 1 to 1 mapping of a container to a DHCP pool that we will use for SDA LAN automation (where the network infrastructure is configured automatically, whats of note here is the loopback 0 IP is pushed and this is the management IP of the device, thus something that would map to a hostname via DNS)
In this example we have two pools for LAN automation, one is a global pool thats used at every site for the transient point to point links. One if site specific and used for the loopback IP addresses, its this second pool we are interested in as these are addresses we need to map to devices.
So in InfoBLox we have a the following:
- Container of ‘192.168.65.64/26 named GPK_SDA_LAN_AUTO_GPK_Loopbacks’
- DHCP pool of ‘192.168.65.96/27 named 163532b7-ab54-46a6-bd7b-6d7bf1f524b4_pool_dummy_0’
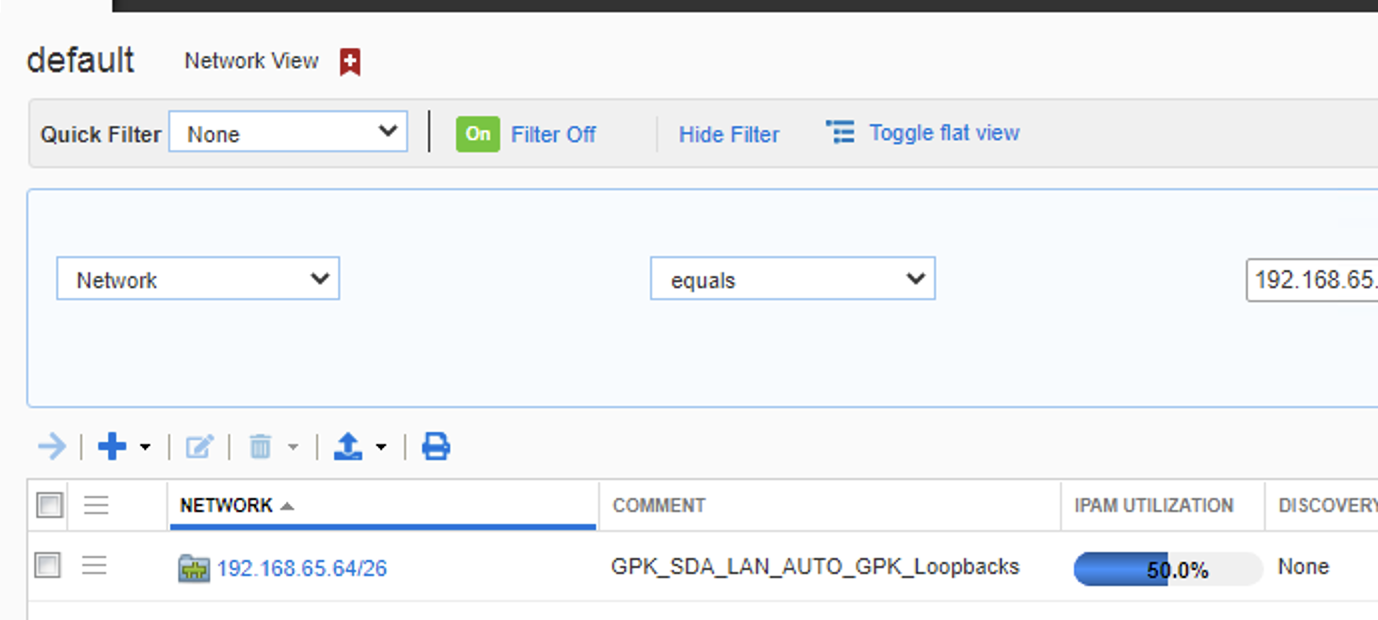
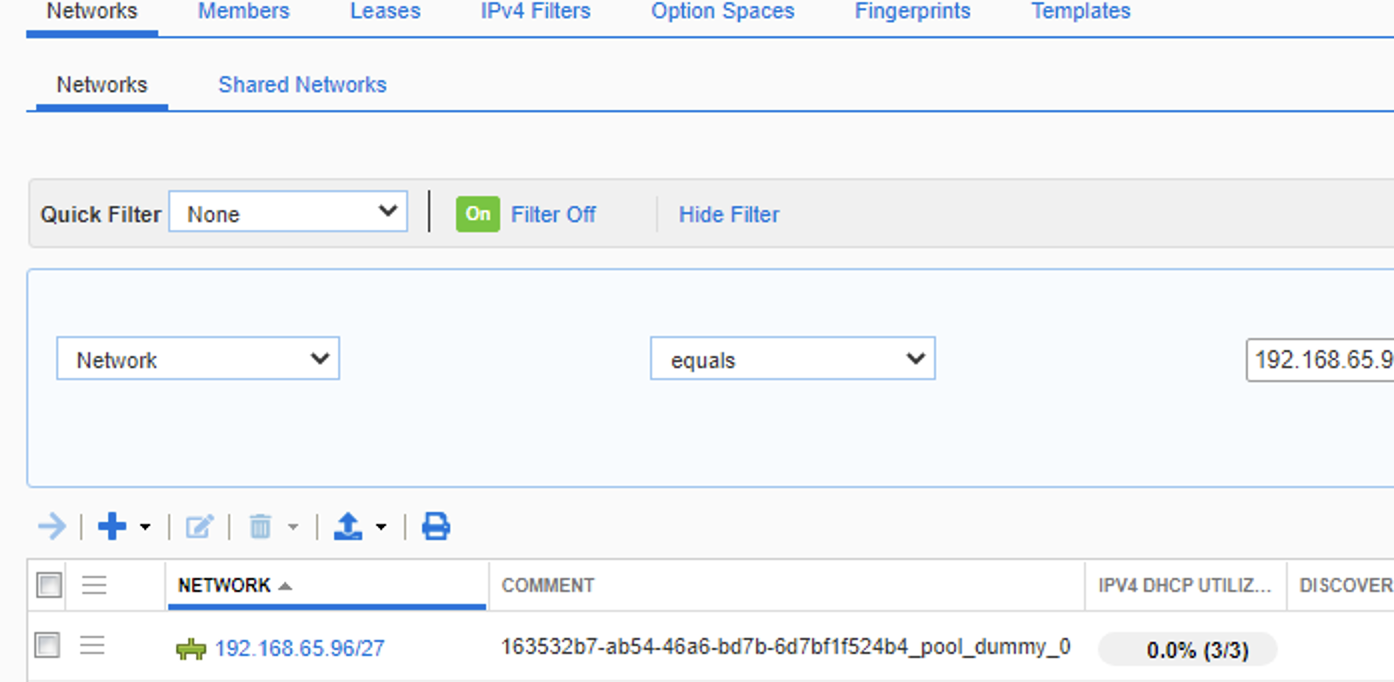
This DHCP pool on infoblox is whats created by DNAC when it assigns the loopbacks (management IP addresses) to the nodes as part of the LAN automation workflow. The odd name of the pool is the internal object ID in DNA.
How this looks on DNAC at a global and site level is as follows:

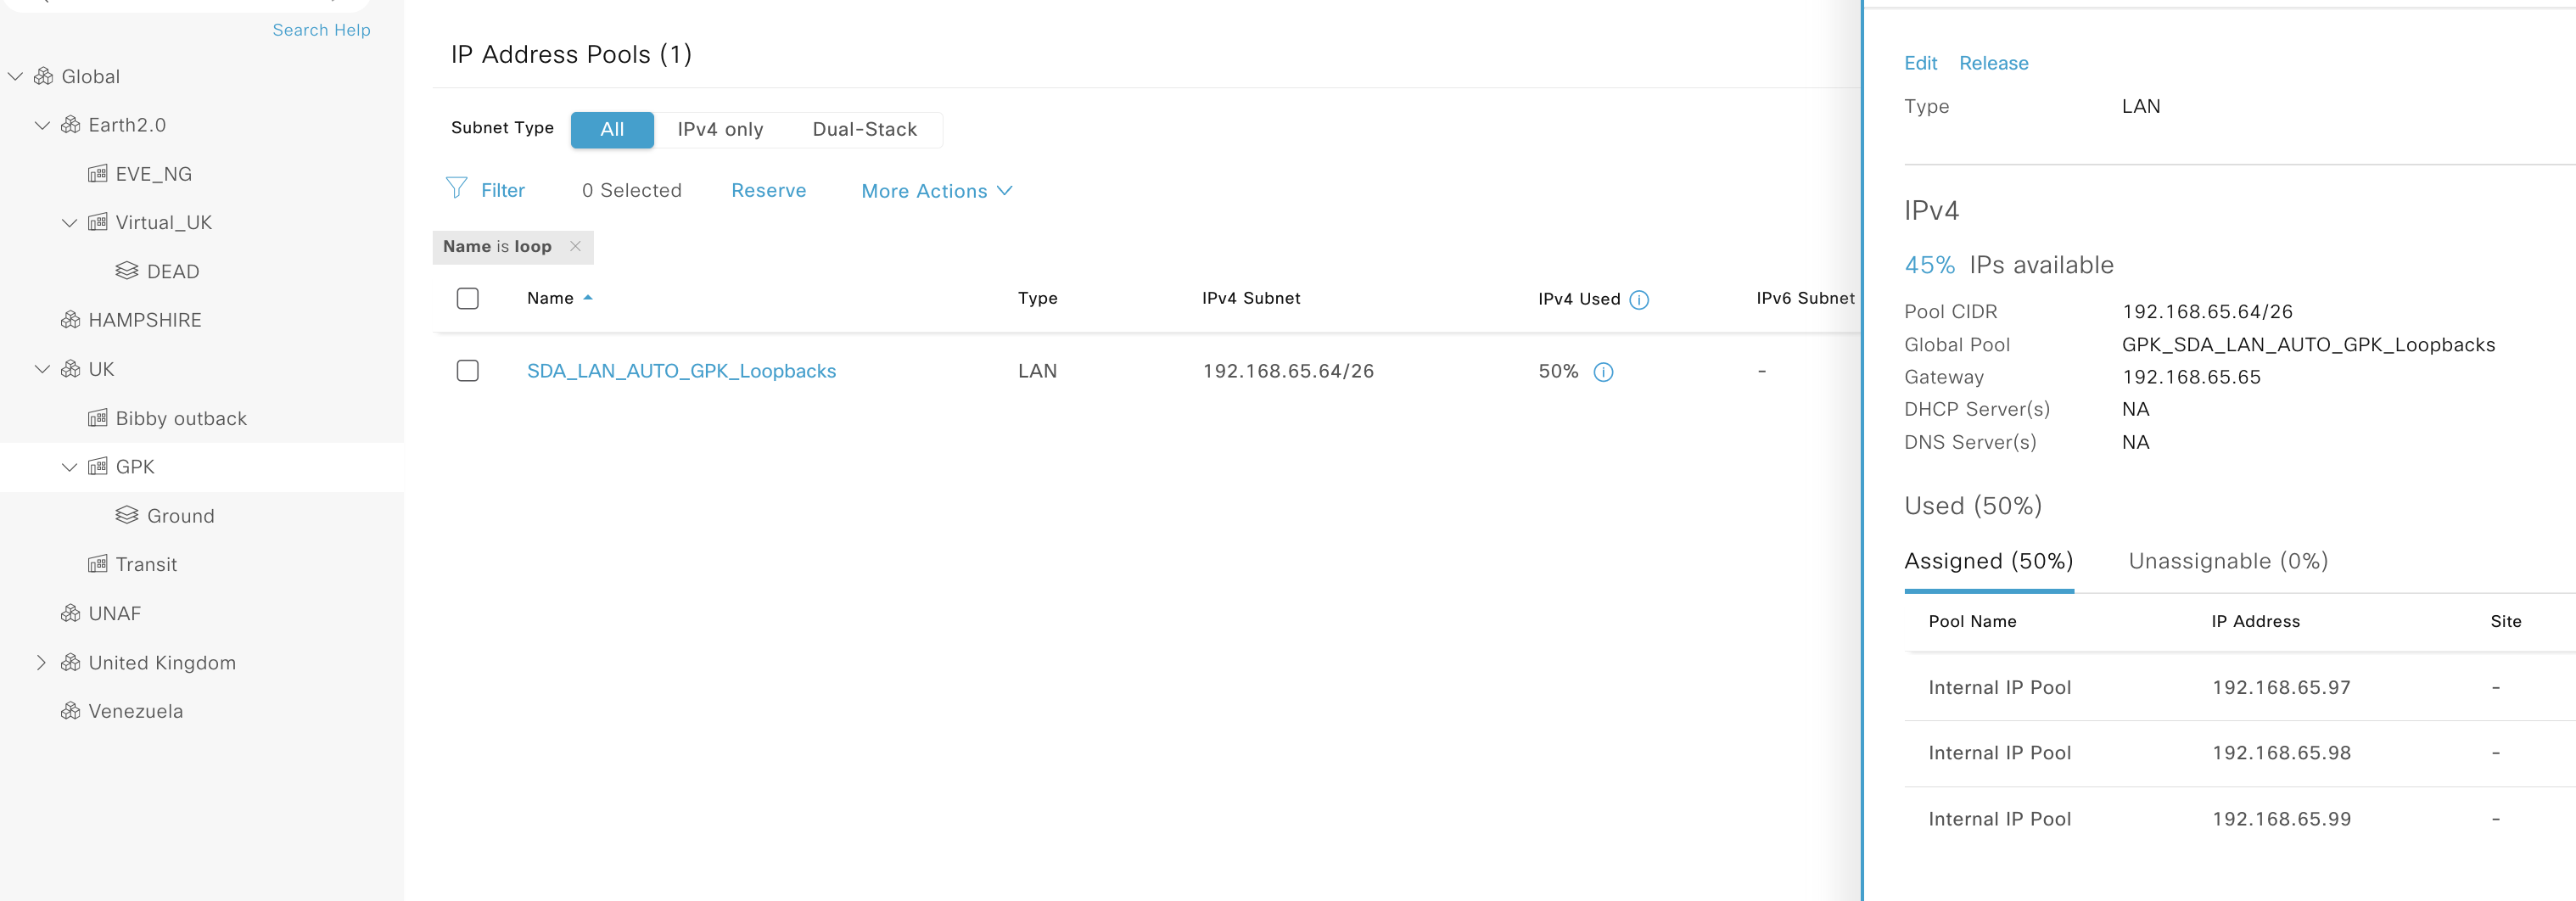
We can see in DNAC that there are three addresses assigned, these are the loopbacks on the three nodes at that site. If we check in infoblox under that DHCP pool we can see the same data:

We can also see this same data as well as the remaining free IPs in the container:
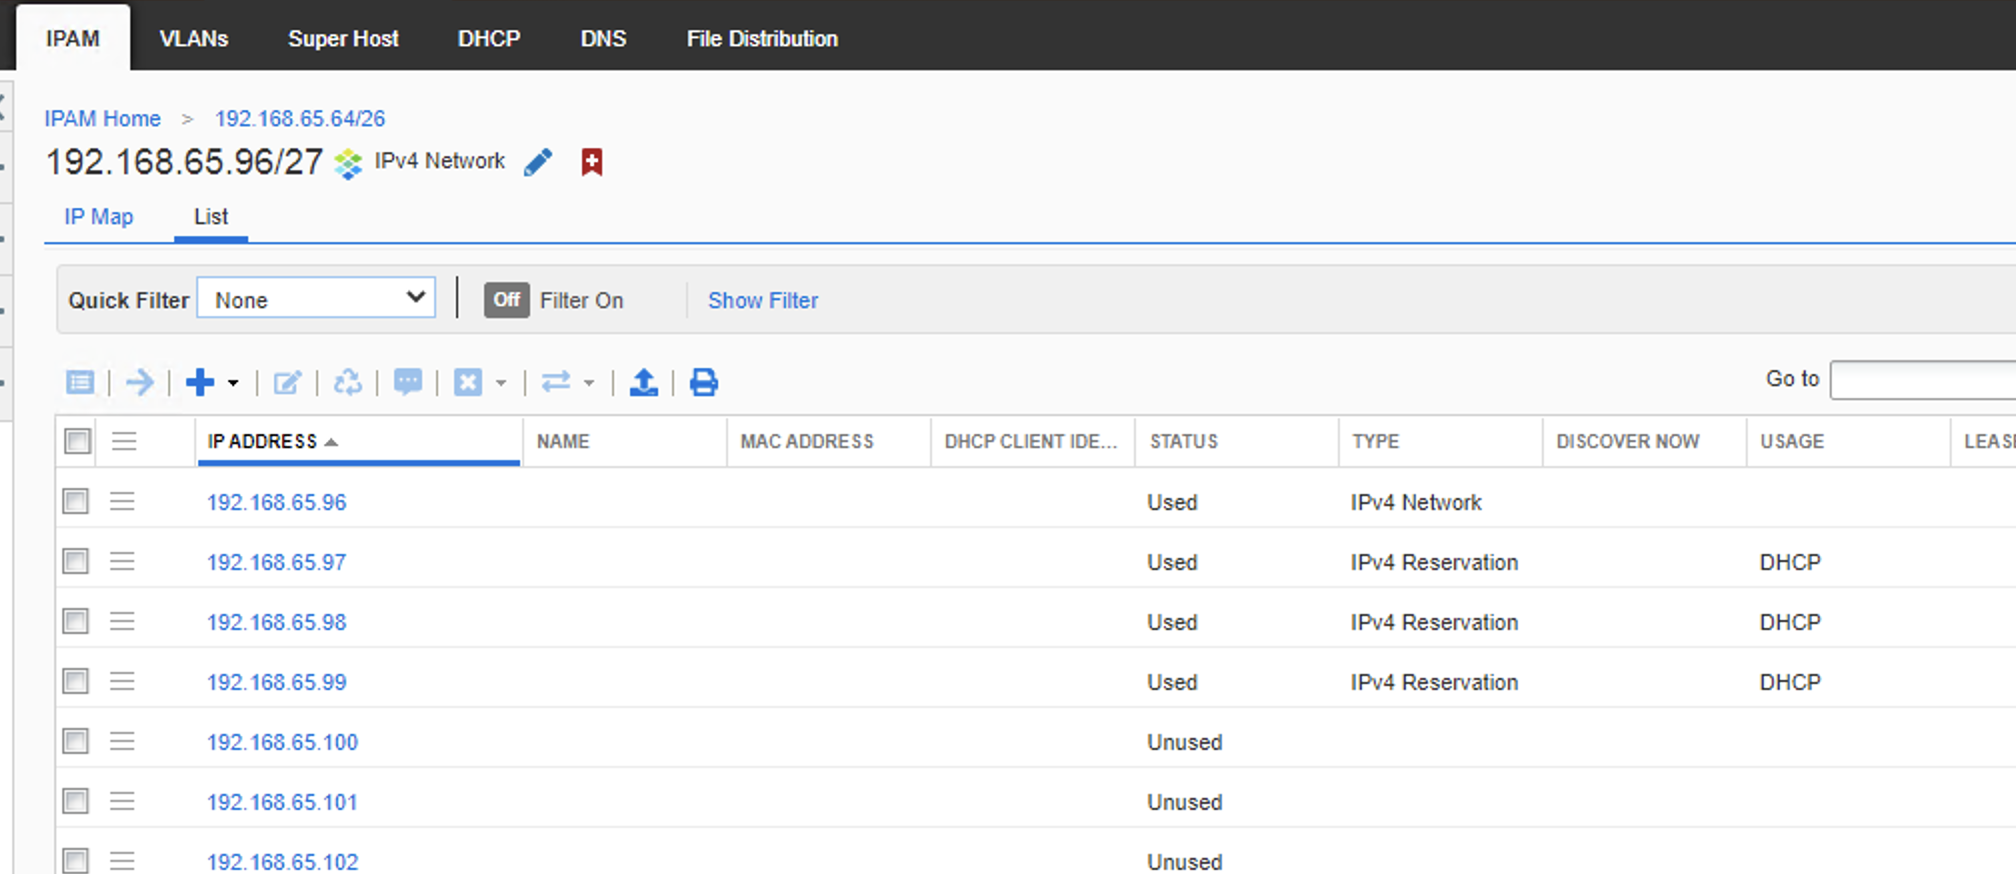
However we have no idea the device it was assigned to in Infoblox, which may help for both DNS and smart folders. If you login to DNAC you can see the device if you filter by the IP address:
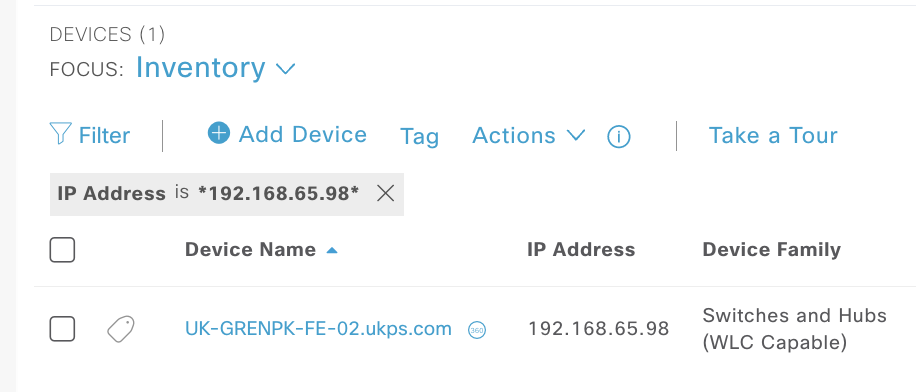
The only was thus far I have to pass this data over is via the API, where i make a call to DNAC to pull all devices/hostnames and post them to the IPAM.
API to pull from DNAC and post to Infoblox
So there are two parts needed for this, the first we need to pull the data from DNAC, secondly we need to push the data to Infoblox.
I used the infoblox api docs and the inbuilt DNAC api docs ““https://dnac.ip.or.hostname/dna/platform/app/consumer-portal/developer-toolkit/apis”” to solve this.
We have two functions, the first get_token gets a token from DNAC for all subsequent calls, this allows for future re-use.
The second get_devices_ip_host iterates over all devices in the DNAC inventory and pulls out the management IP and the hostnames and returns this as a dictionary, with the hostname as a key. If there is no hostname present, the name “MISSING +Current Index” is used.
There is also a single object called DNAC_data that has all the info needed to login to DNAC, its show here for ease, however this should be help in some external protected database. (this is not a best practice guide, its a how to!)
import requests
from requests.auth import HTTPBasicAuth
import json
import logging

def get_token(dnac_system):
    """[summary]
    Here we call up the API to get a token
    """
    logging.info(f'Token get for {dnac_system["IP"]}:{dnac_system["Port"]}')
    url = (f'https://{dnac_system["IP"]}:{dnac_system["Port"]}/api/system/v1/auth/token')
    headers = {'content-type': 'application/json'}
    resp = requests.post(url, auth=HTTPBasicAuth(username=dnac_system['Username'], password=dnac_system['Password']), headers=headers,verify=False)
    ####Add in error to catch bad password
    token = resp.json()['Token']
    logging.info(f'DNAC token got {token}')
    return token

def get_devices_ip_host(dnac_system, token, role=0):
    """[summary]
    Gets all devices
    """
    headers = {'content-type': 'application/json'}
    headers['x-auth-token'] = token
    BASE_URL = f'https://{dnac_system["IP"]}:{dnac_system["Port"]}'
    ###Get all devices
    DEVICE_URL = '/dna/intent/api/v1/network-device'
    device_data = requests.get(BASE_URL+DEVICE_URL, headers=headers, verify=False)
    device_data = device_data.json()
    devices = ({(v['hostname']
            if (v['hostname'] != '' and v['hostname'] is not None)
            else f'MISSING {i}'):
            v['managementIpAddress']
            for i,v in enumerate(device_data['response'])
            })
    return devices

DNAC_data = {'Host': 'own.lab',
 'IP': '192.53.254.20',
 'Password': 'dsssfasfa',
 'Port': 50002,
 'Username': 'dnaadmin'}

token = get_token(DNAC_data)
devices = get_devices_ip_host(DNAC_data, token, 'ACCESS')
After we have executed the above code we have the global object devices with the needed data that we can pas to infoblox as DNS records.
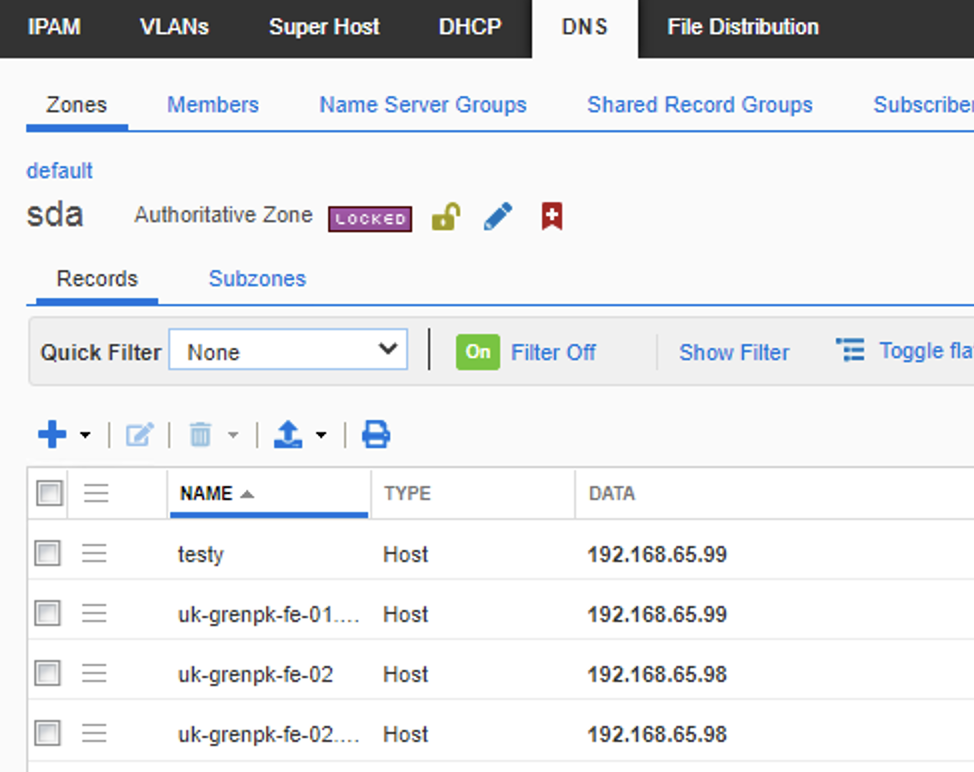
Note that we are passing each device one by one and as my exported devices did not have a fully qualified name I got an error as outlined in this post. Thus I added the .sda onto the hostname to match the sda domain in infoblox.
def post_ipam(devices):
    import requests
    requests.packages.urllib3.disable_warnings()  # Disable SSL warnings in requests #
    url = "https://192.53.254.20:50005/wapi/v2.10/record:host?_return_as_object=1"
    headers = {'content-type': "application/json"}
    for k,v in devices.items():
        payload = "{\"name\":\""+k+".sda\",\"ipv4addrs\": [{\"ipv4addr\":\""+v+"\"}]}"
        response = requests.request("POST", url, auth=('admin', 'password'), data=payload, headers=headers, verify=False)

post_ipam(devices)
Infoblox DNS populated records
If you also wanted to validate infoblox with the API, you can use:
import requests
requests.packages.urllib3.disable_warnings()
url = "https://192.53.254.20:4433/wapi/v2.10/record:host?_return_as_object=1"
response = requests.request("GET", url, auth=('admin', 'infoblox'), verify=False)
print(response.text)
In summary
You can use these two calls to push and pull data as needed, where the end state should be harmony between the IPAM and DNAC. The kicker is that if you are using LAN automation with SDA, DNAC assigns the IP’s in a seemingly unpredictable manner. So you must first complete this LAN auto task and then port the information from DNAC over to infoblox. It would be wise to do some sort of checking or filtering, such as only pulling data from DNAC thats related to the last LAN automation job, via using something like a ‘Subnet’ filter on the initial calls to DNAC. As well as some pre-check to the IPAM to ensure there is no overlap.
You could of course also forgo LAN automation and build the underlay manually with pre-determined IPs to hostnames.
Views DHCP and DNS with DNAC
The assurance engine in DNAC can be used to resolve IPs/FQDNS to provide better reporting metric within the DNAC controller.
For DNS retrieval from Infoblox via (DNAC->provision->Service Catalog->Discovered Applications), (click {Infoblox DNS server, edit].. This will only work if you use a zone on IFB (IFB->Data Management->DNS->Zones) that’s in the same VIEW that you integrated DNAC with, the defaults is ‘default’ for the integration.
In infoblox you can create views via (IPAM->Admin->Network views), where i have two, the ‘default’ and ‘ENGLAND’
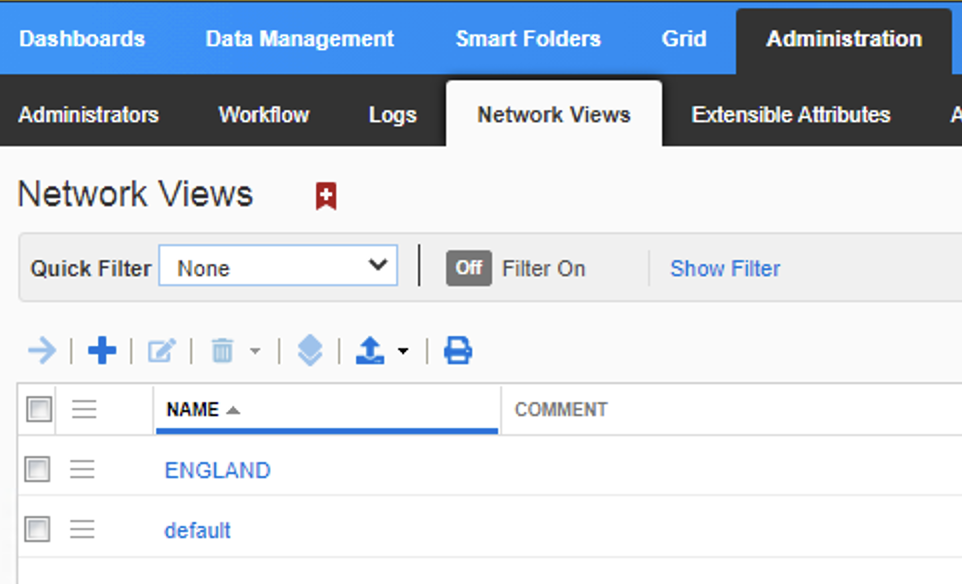
Where I have the ‘London’ DNS zones in the ENGLAND view, and the ‘SDA’ zones in the ‘Default’ view.
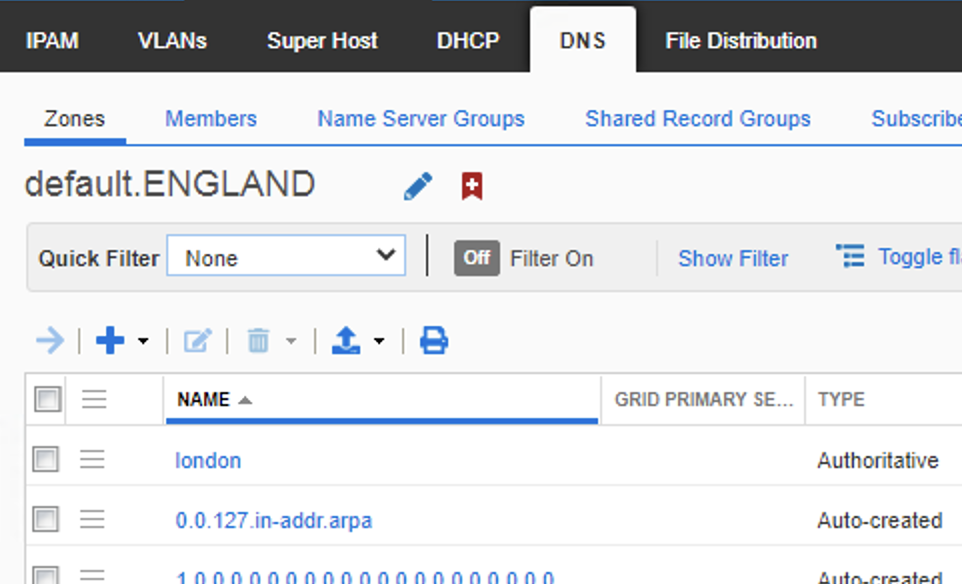
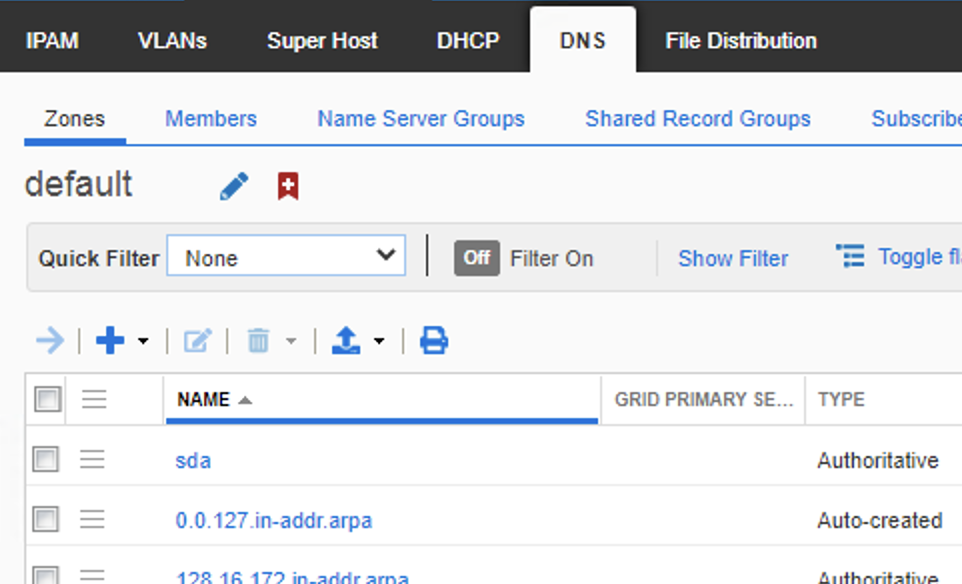
Per the opening section of this post we saw that DNAC integrated with the ‘Default’ view, thus any attempt to resolve FQDNS outside of this view will not work
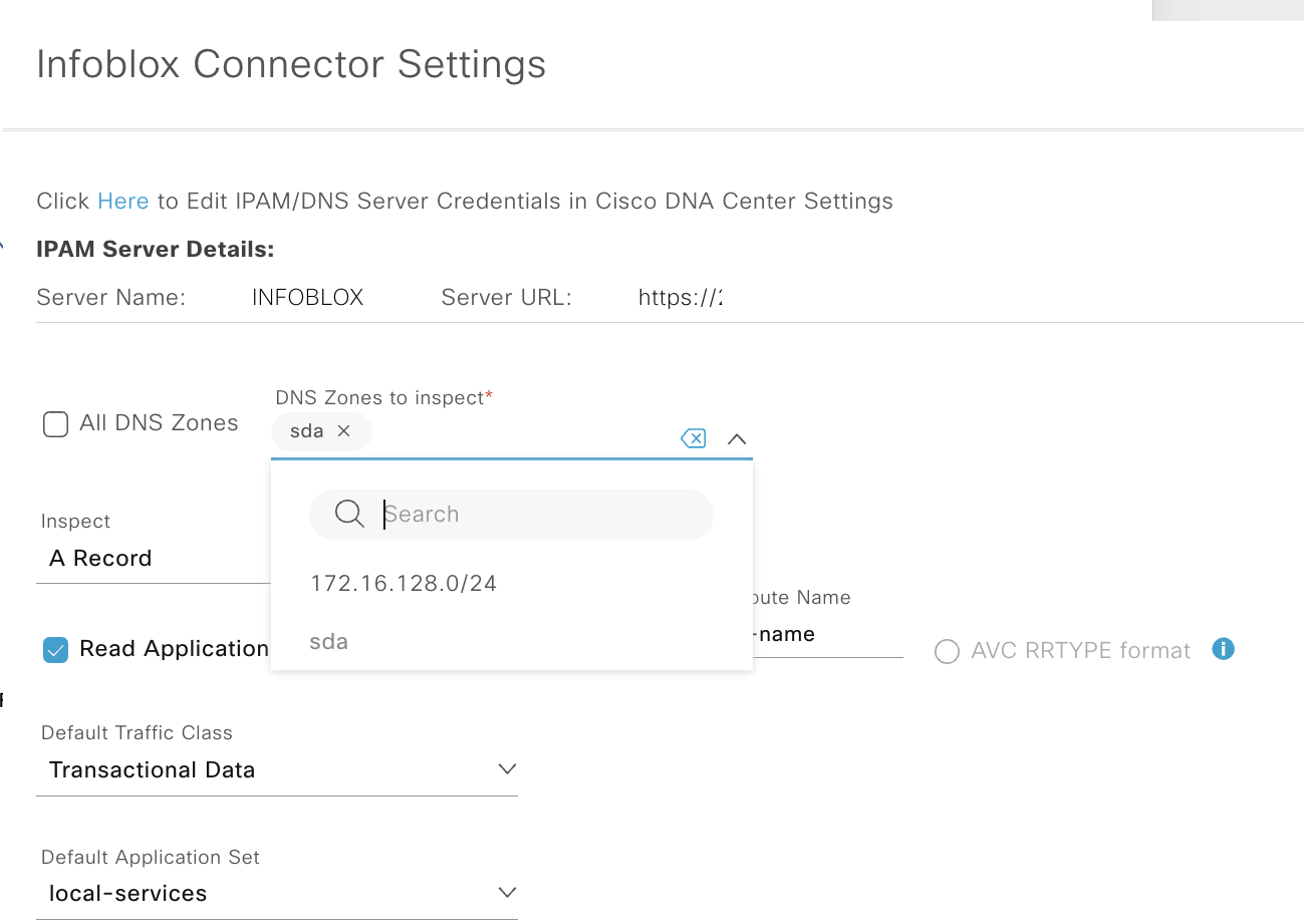
Thus it’s also tru that and IP address you want to push/pull from infoblox must also reside within the same view that you have integrated with.
Infoblox with ISE PXG
The data that is exchanged between Infoblox and CiscoISE/pxGrid enables significant use cases for protecting networks, such as:
- RPZ/ADP hits data sent to Cisco ISE can trigger Cisco to quarantine the end station that is trying to resolve to a known bad site (SPZ) or launched a DNS attack (ADP)
- Device OS information can be used to determine types of devices on the network and if some of those devices are prohibited. For example, gaming consoles might be prohibited in some network environments. And the ratio of devices could be used to plan out network scalability.
- Security group information could be used to correlate RPZ events. If a device within a security group is triggering RPZ hits, then devices in that security group could be quarantined.
- Session state information could be used to determine if an unauthorized user is trying to log into the network. For example, a large number of authentication failures from a workstation could be a clue to a hacking attack.
- User name and domain name can be used with the Infoblox Identity Mapping feature.
- The EPS (endpoint protection service) status provides quarantine status for a workstation. If the workstation is quarantined, then this warrants further investigation.
- A NAS (network access server) IP address could be used to determine if a NAS is being overrun with authentication requests.
- The posture status is used to determine if a workstation is compliant or not in terms of having proper anti-malware software.
- A TrustSEC tag defines the security policy for the workstation that was dynamically placed into a logical group.
- A posture time stamp tells you the time of the posture status. For example, when a workstation falls out of compliance on having up-to-date anti-malware software installed.
DNAC does not push ranges or gateway info to infoblox
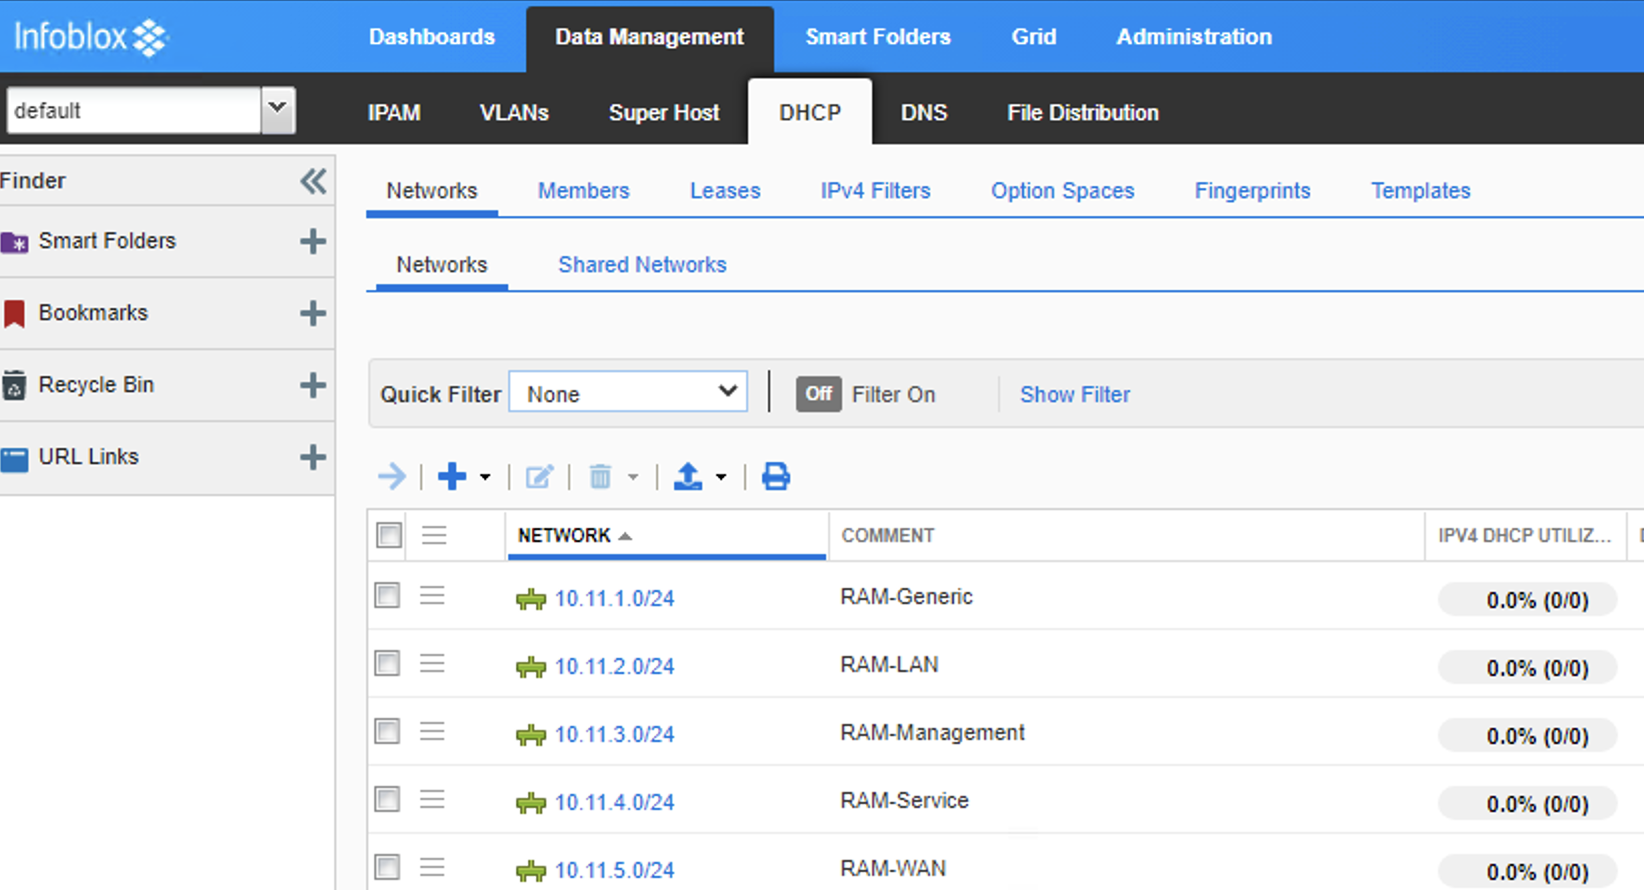
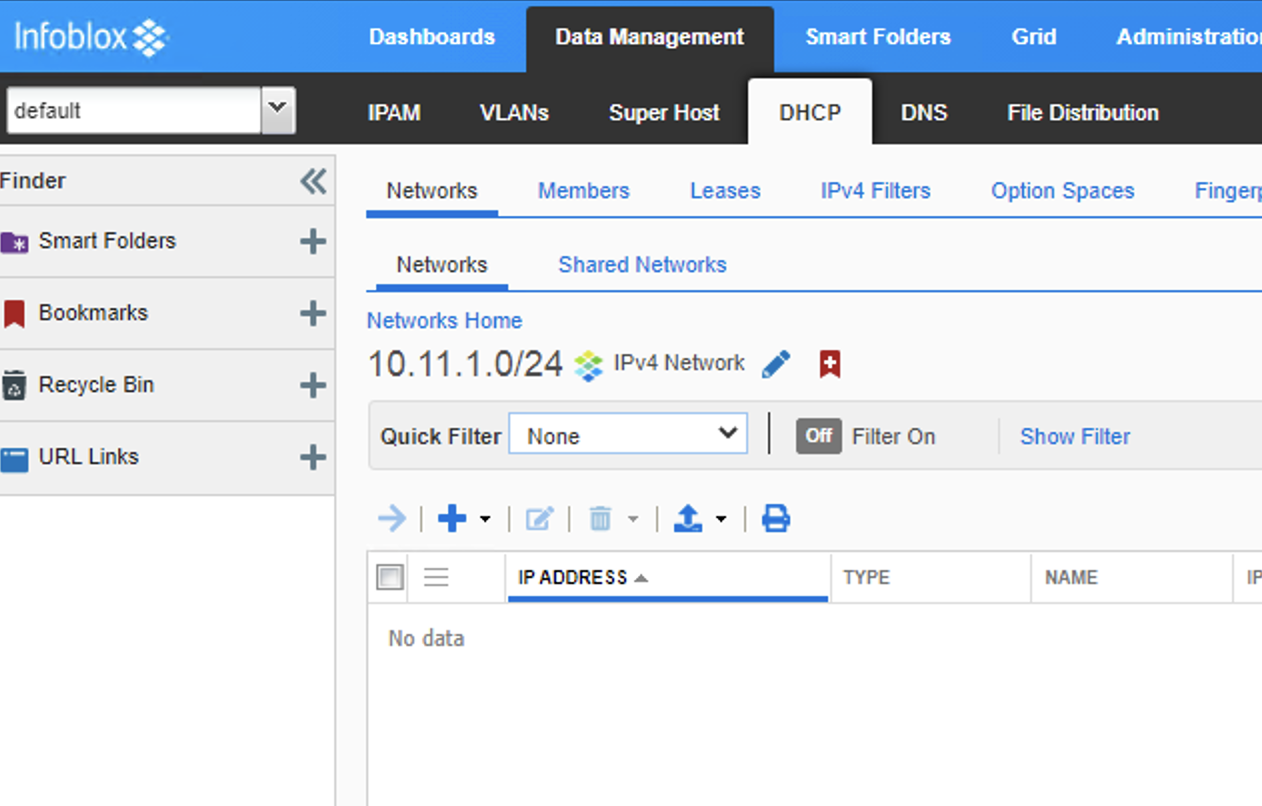
When you create an IP pool in DNAC, this does not create a DHCP range in infoblox, so its not even immediately usable at this stage.
Even after DNAC pushed the Pool to the IPAM, if you browse to the IPAM and look under “data management’ -> ‘DHCP’a and find that pool, there are zero ranges, so they wont work, you still need to login and create the needed pools in the IPAM.
- On infoblox i created a new empty DHCP pool (not an empty container, as DNAC cannot see containers, just DHCP pools)
10.11.0.0/16
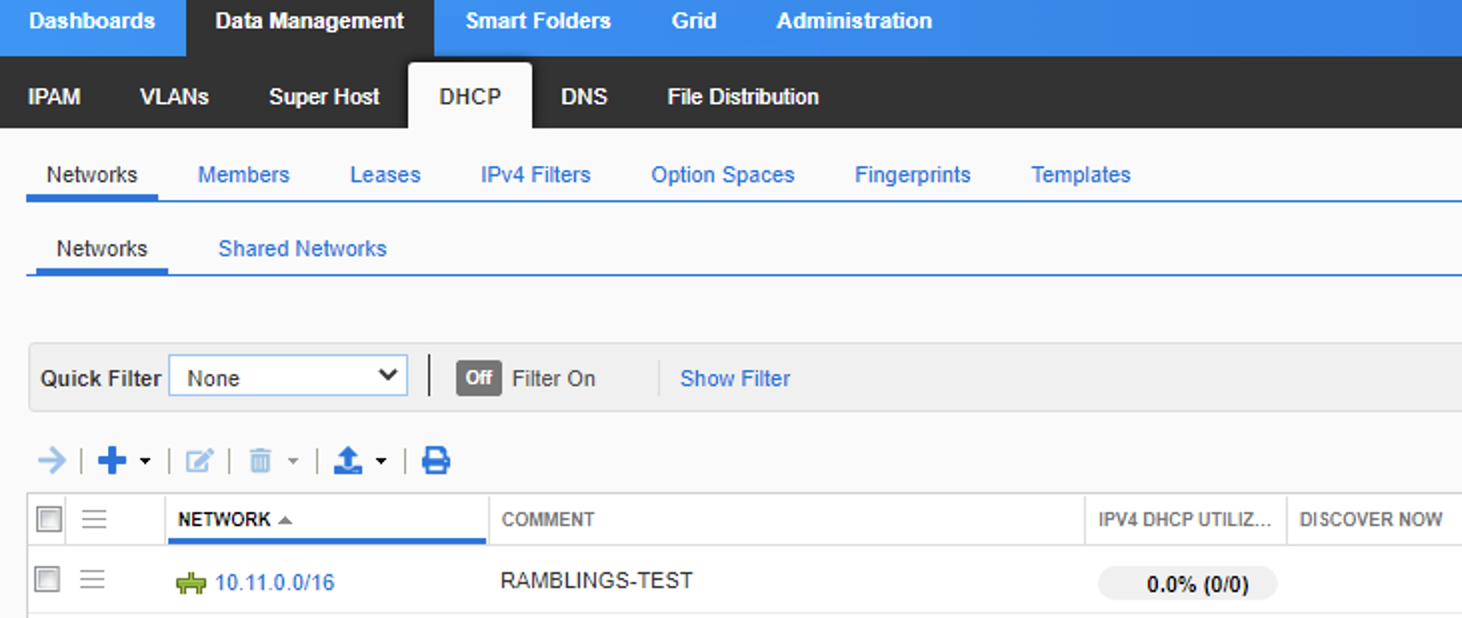
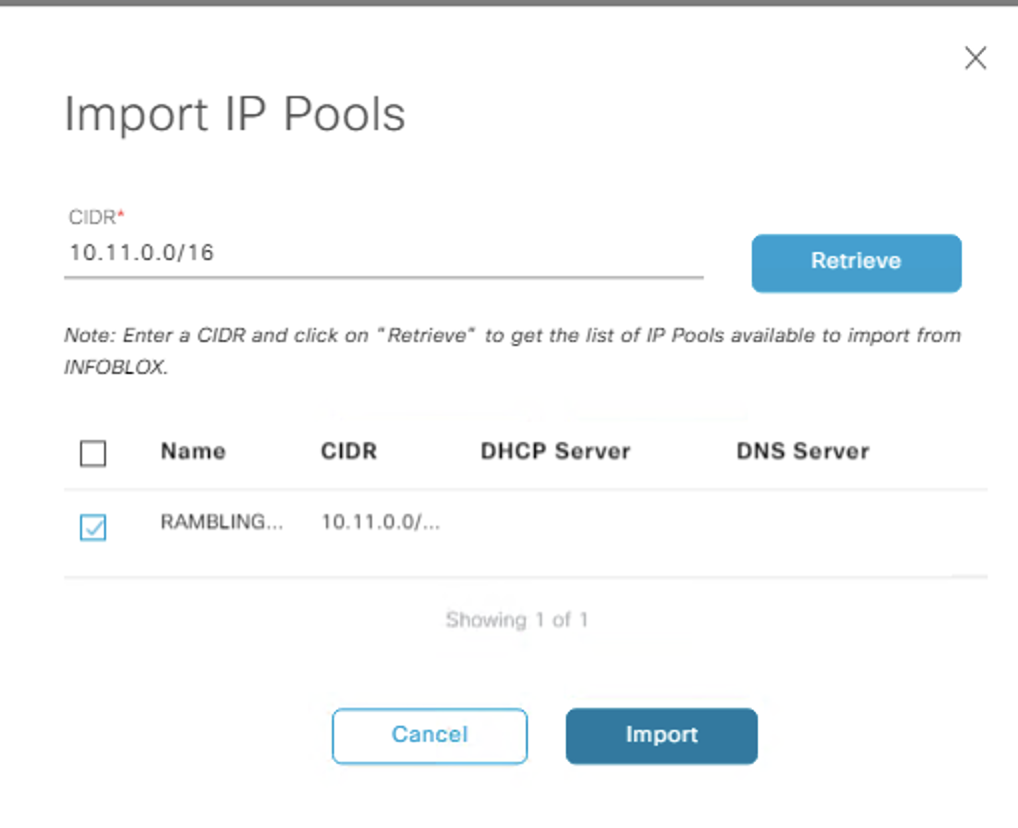
- Then import this into DNAC.
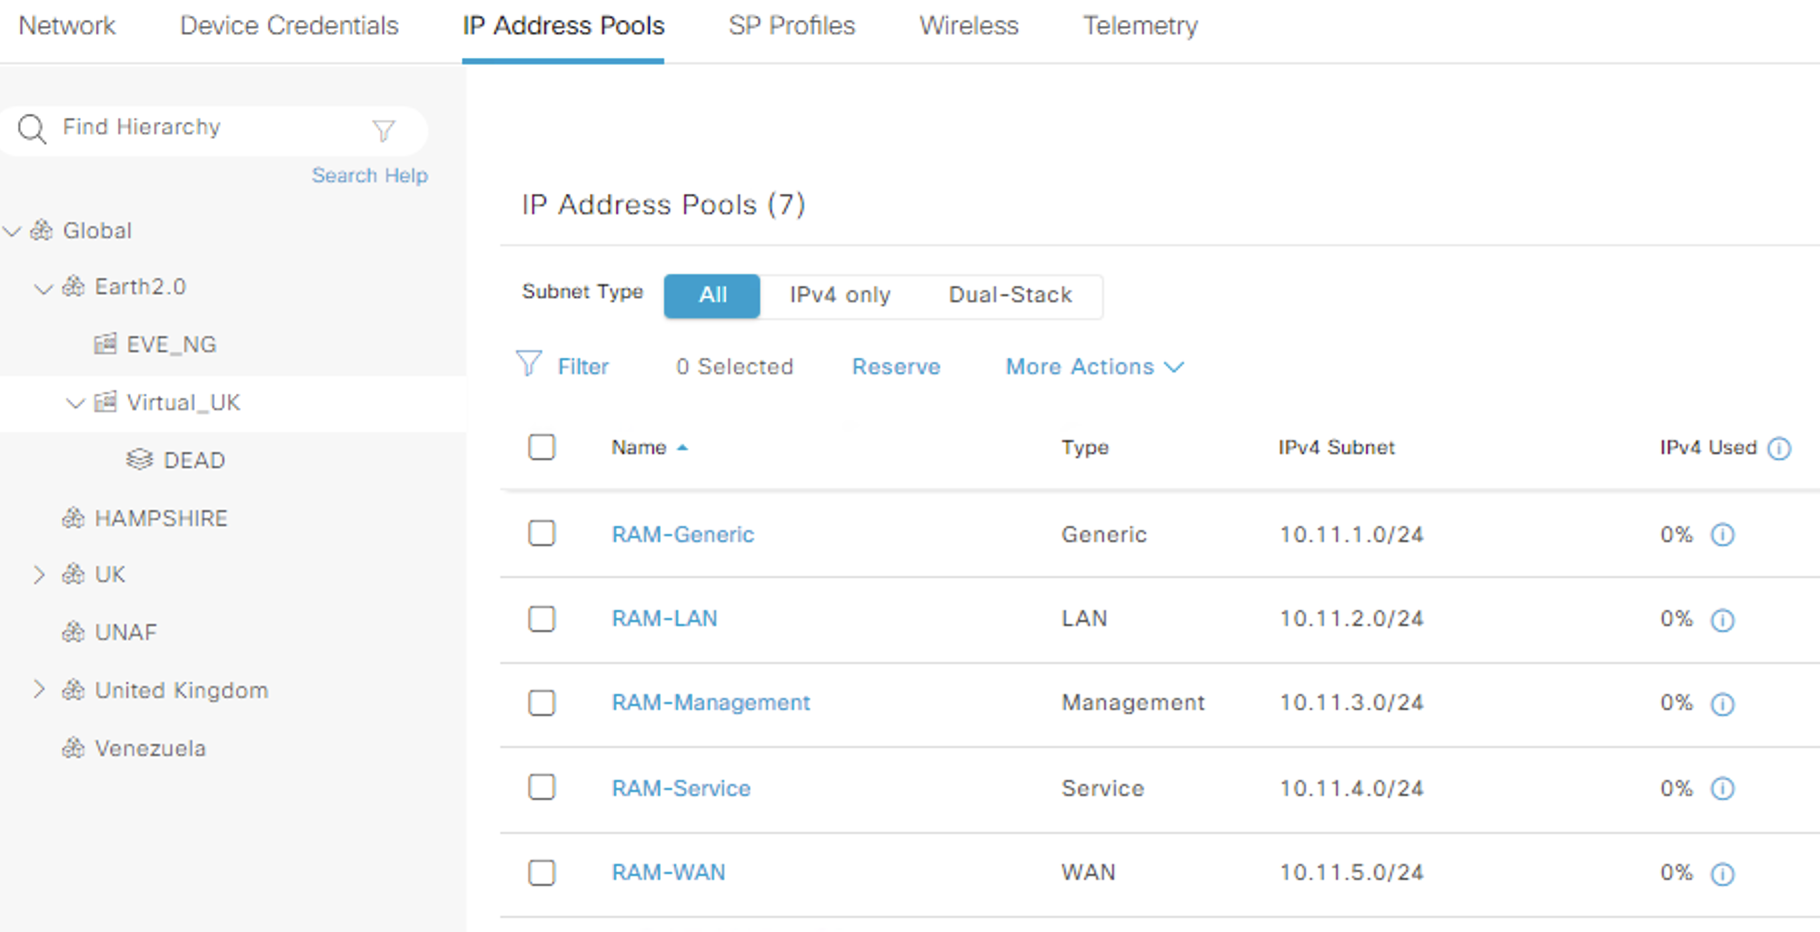
- At a site level i created a sub pool of each of the five types from this global pool (to see if theres any difference in them)
| Name | Type | Subnet | Gateway | DHCP & DNS |
|---|---|---|---|---|
| RAM-Generic | Generic | 10.11.1.0/24 | 10.11.1.1/24 | Infoblox IP |
| RAM-LAN | LAN | 10.11.2.0/24 | 10.11.2.1/24 | Infoblox IP |
| RAM-Management | Management | 10.11.3.0/24 | 10.11.3.1/24 | Infoblox IP |
| RAM-Service | Service | 10.11.4.0/24 | 10.11.4.1/24 | Infoblox IP |
| RAM-WAN | WAN | 10.11.5.0/24 | 10.11.5.1/24 | Infoblox IP |
Site note, i pushed these pools using the API as it was faster using the following:
Used excel and a CSV to hold the needed data:
RAMBLINGS-TEST,10.11.0.0/16,Generic,10.11.1.0/24,10.11.1.1,2.6.13.205,2.6.13.205,Global/Earth2.0/Virtual_UK,RAM-Generic
RAMBLINGS-TEST,10.11.0.0/16,LAN,10.11.2.0/24,10.11.2.1,2.6.13.205,2.6.13.205,Global/Earth2.0/Virtual_UK,RAM-LAN
RAMBLINGS-TEST,10.11.0.0/16,Management,10.11.3.0/25,10.11.3.1,2.6.13.205,2.6.13.205,Global/Earth2.0/Virtual_UK,RAM-Management
RAMBLINGS-TEST,10.11.0.0/16,Service,10.11.4.0/25,10.11.4.1,2.6.13.205,2.6.13.205,Global/Earth2.0/Virtual_UK,RAM-Service
RAMBLINGS-TEST,10.11.0.0/16,WAN,10.11.5.0/26,10.11.5.1,2.6.13.205,2.6.13.205,Global/Earth2.0/Virtual_UK,RAM-WAN
Used python to get the site ID for the target site, then post the CSV data back to DNAC to update the IP pools (for this to work we had already gleaned a token from DNAC (see earlier posts))
def site_id(token):
    headers = {'content-type': 'application/json'}
    headers['x-auth-token'] = token
    BASE_URL = f'https://{dnac_data[0]}:{dnac_data[1]}'
    SITE = 'Global/Earth2.0/Virtual_UK'
    results = requests.get(BASE_URL+'/dna/intent/api/v1/site?name='+SITE, headers=headers, verify=False)
    return(results.json()['response'][0]['id'])


def passed(token, siteid):
    import time
    headers = {'content-type': 'application/json'}
    headers['x-auth-token'] = token
    BASE_URL = f'https://{dnac_data[0]}:{dnac_data[1]}'
    file = open('IP_POOLS.csv','rt')
    dhcp_list = [line.strip().split(',') for line in file if len(line.split(',')[1]) != 0]
    for pool in dhcp_list:
        IP_POOL = {
                    "name": pool[8],
                    "type": pool[2],
                    "ipv6AddressSpace": False,
                    "ipv4GlobalPool": pool[1],
                    "ipv4Prefix": True,
                    "ipv4PrefixLength": 24,
                    "ipv4Subnet": pool[3].strip('/24'),
                    "ipv4GateWay": pool[4],
                    "ipv4DhcpServers": [pool[5]],
                    "ipv4DnsServers": [pool[6]]
                }
        IP_POOL_NEW = json.dumps(IP_POOL)
        requests.post(BASE_URL+'/dna/intent/api/v1/reserve-ip-subpool/'+siteid, headers=headers, verify=False, data=IP_POOL_NEW)
        print(f'Pushed pool {IP_POOL_NEW}')
        time.sleep(0.300)

siteid = site_id(token)
passed(token, siteid)
End of Side note.
- Then on inspection of the IPAM, we see the pools are all there. However there is no ranges to hand out IPs, no default-gateway nothing. So this also needs populating via some other means (manually/API)
Import IPAM pools into DNAC
Remembering from before ““The IP Pool needs to be “empty””. Ie. No scope or current reservations.””, lets check the limitations of this first.
Setup steps on IPAM:
- Create top container
10.12.0.0/16and two sub DHCP pools10.12.1.0/24with no scopes defined &10.12.2.0/24with scopes created (available range, default gateway & option 43) - Create top network/DHCP pool
10.13.0.0/16and two sub DHCP pools10.13.1.0/24with no scopes defined &10.13.2.0/24with ranges created (available range, default gateway & option 43) and static reservations set.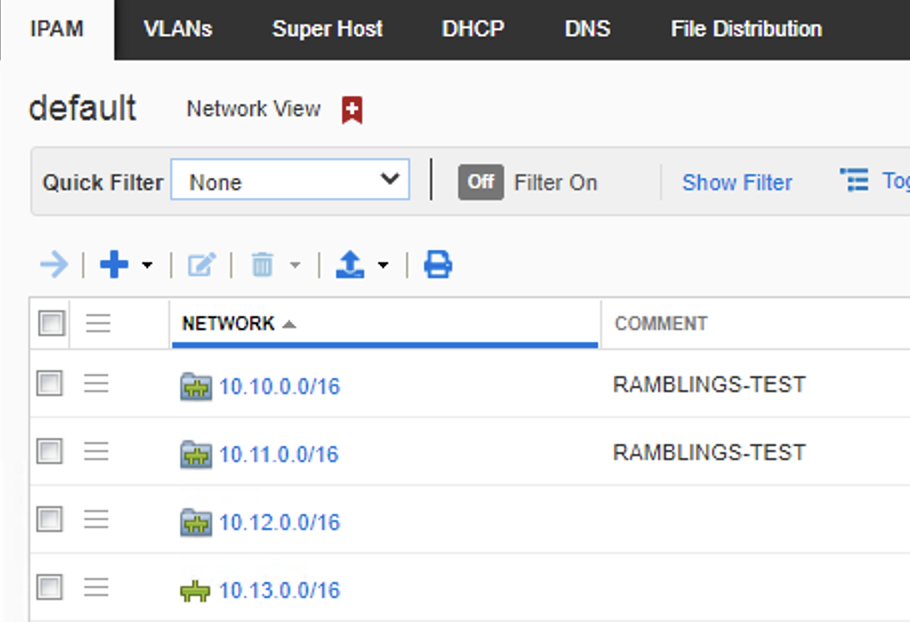
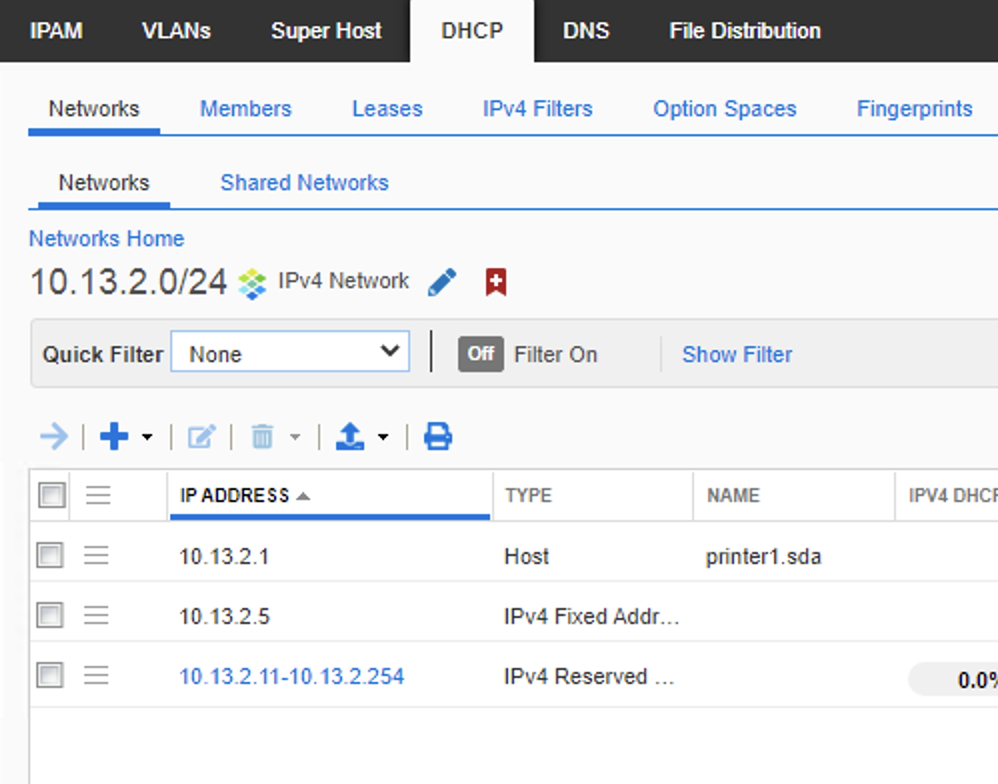
On DNAC
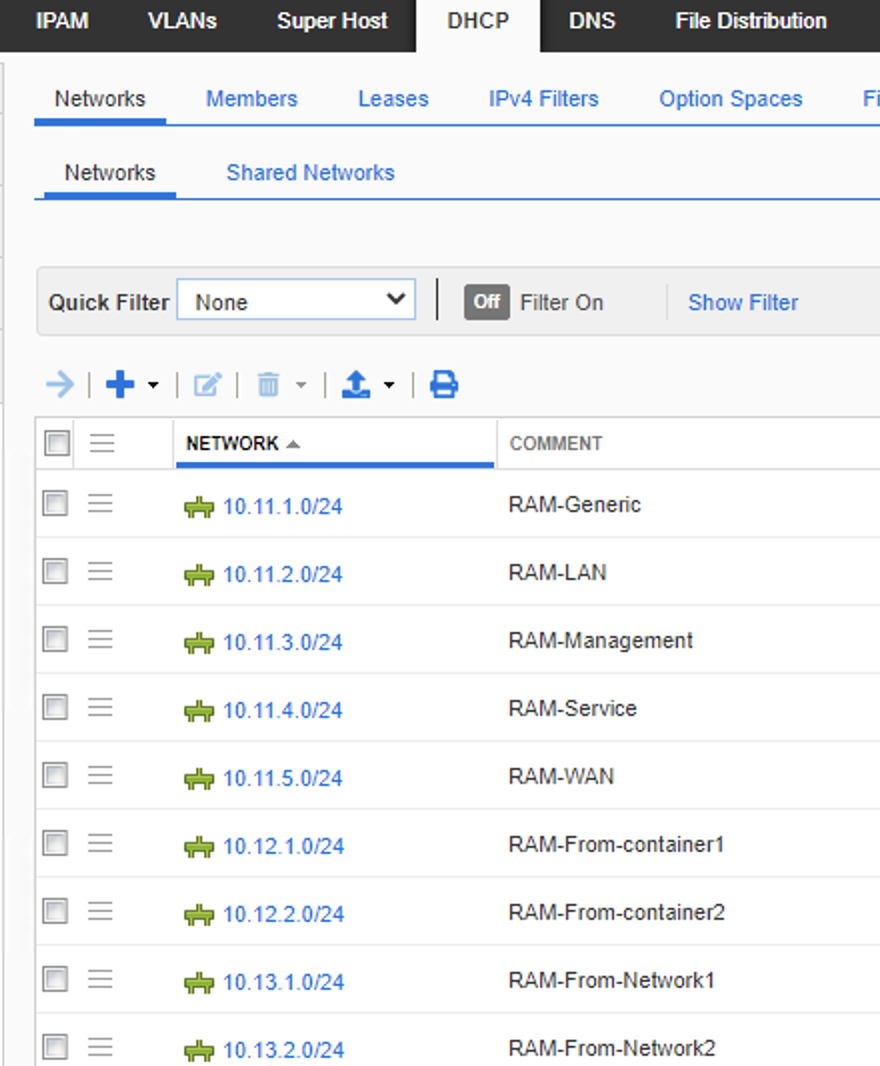
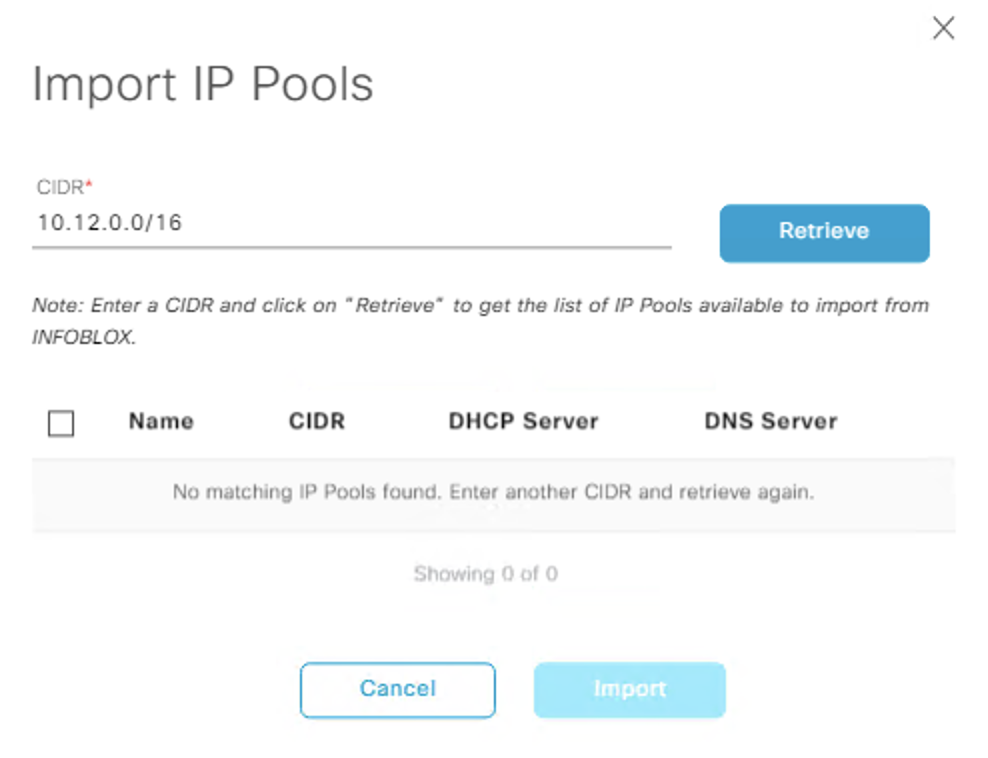
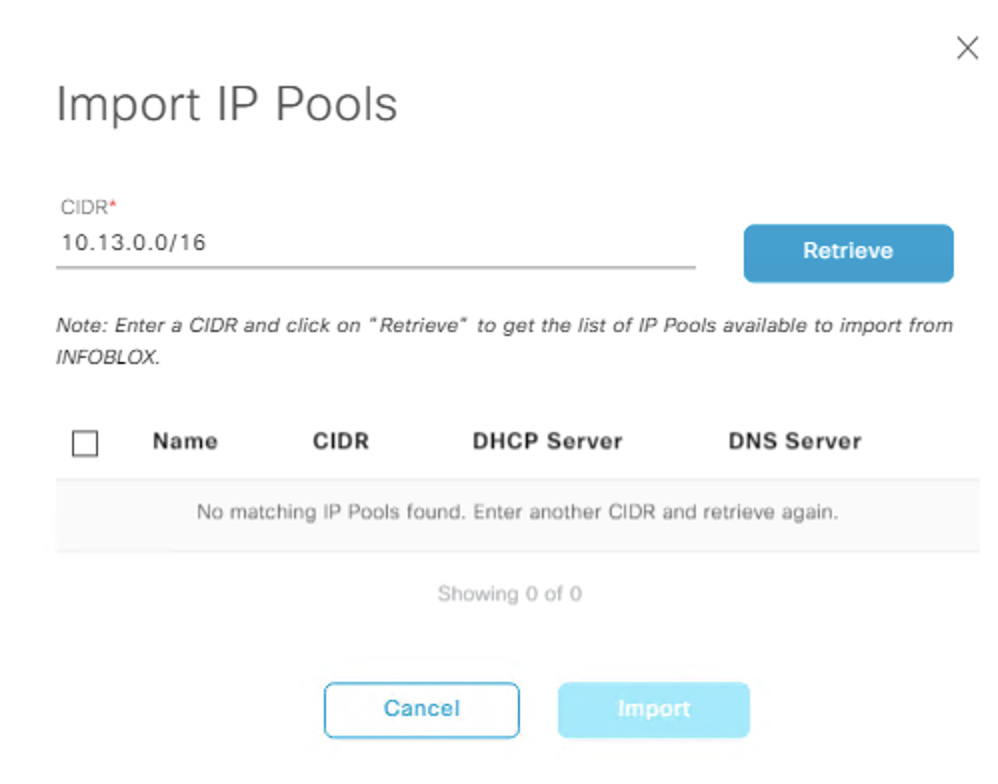
- Import the 10.12.X.0/24 DHCP pools (remember you cannot import containers) at the global level and assign them to the site. ((Note that for the 10.13.0.0/16 range, even though we created this as a network, when you create sub-pools it gets converted into a container, thus we can no longer import this into DNAC))
Can see we cannot import the containers here:
Can import the two pools belonging to the container.
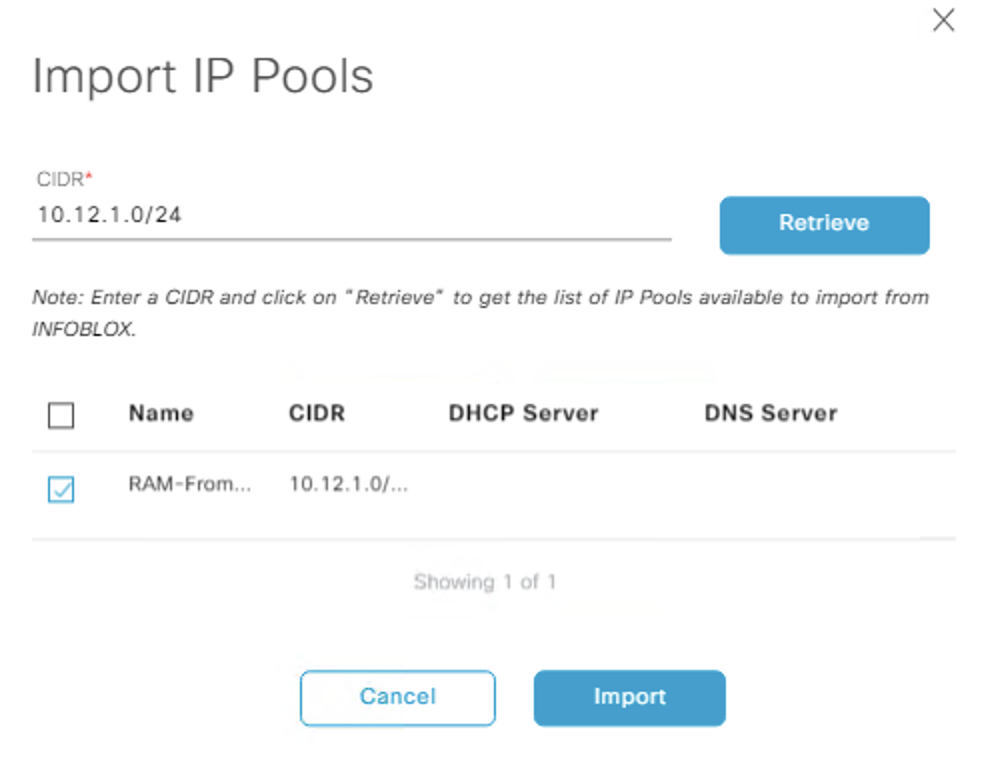
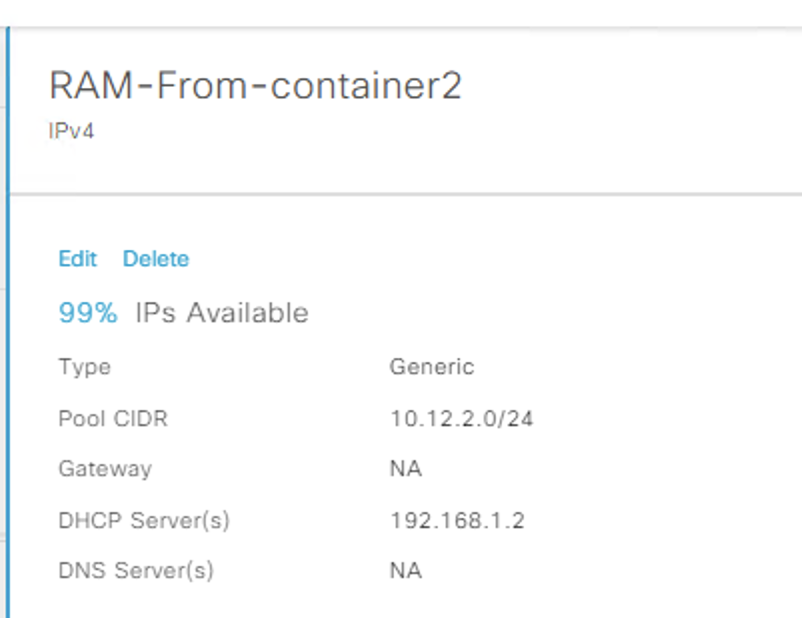
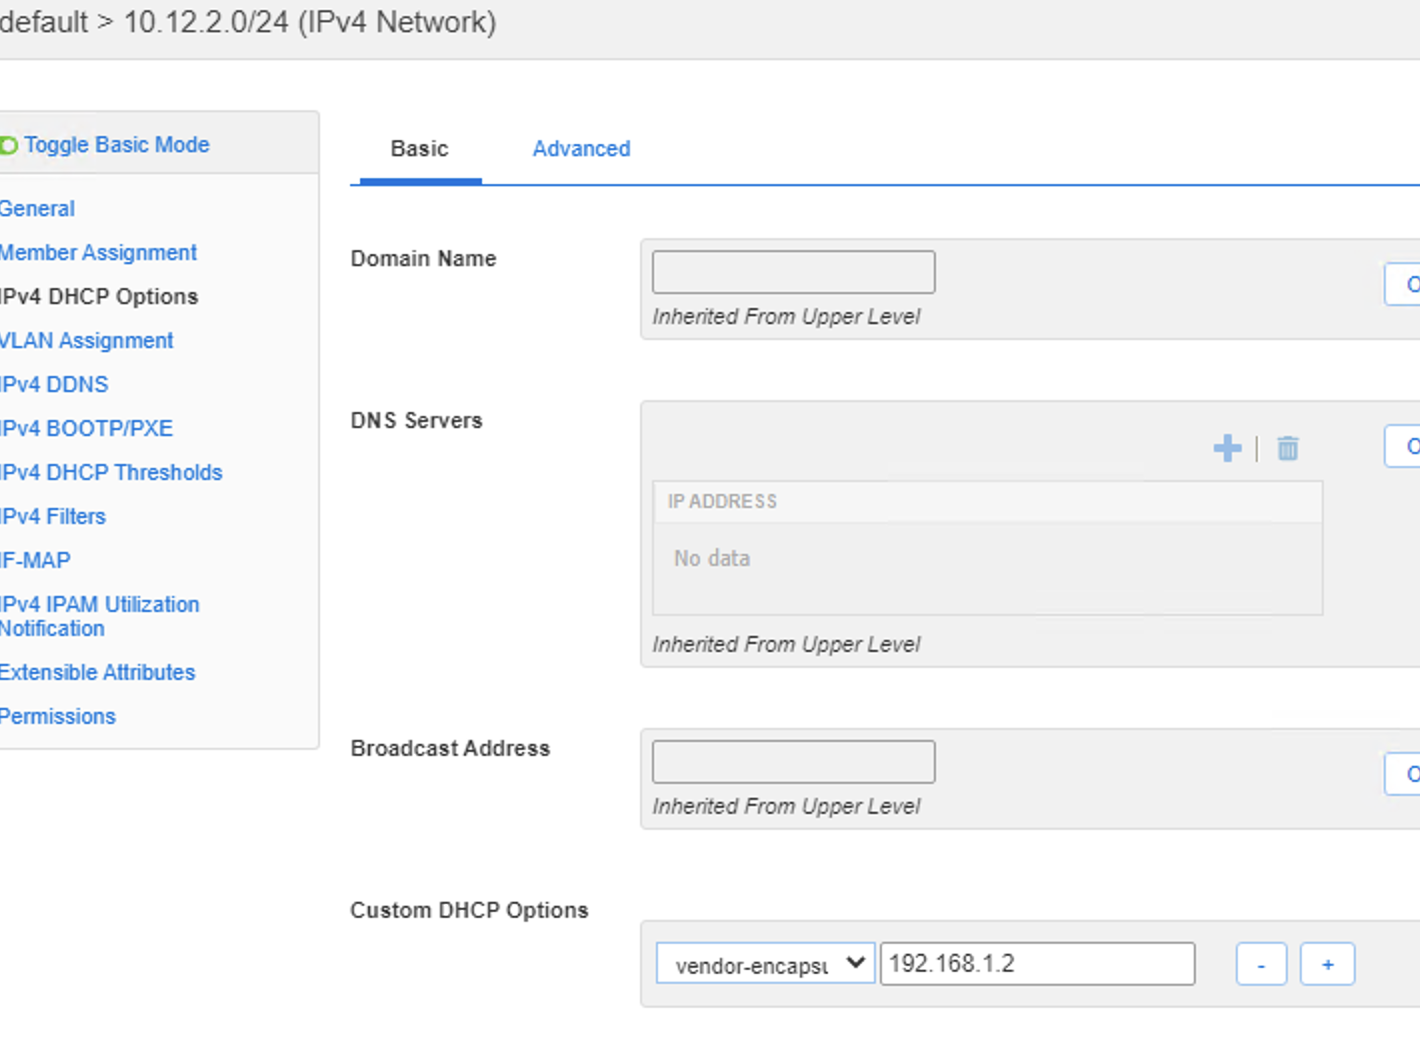
For the pool that has ranges set, DNAC interpreted the option 43 as the DHCP server and set this on the IP pool as show here, so that would need to be considered if o43 is used (which it would be for and Extended node, or Access point pools), it did not pick up the Gateway either, even though it was set. This is really just cosmetic as when you map the pool to a site, thats when you select these options.
dnac show pool
IPAM show O43 and gateway
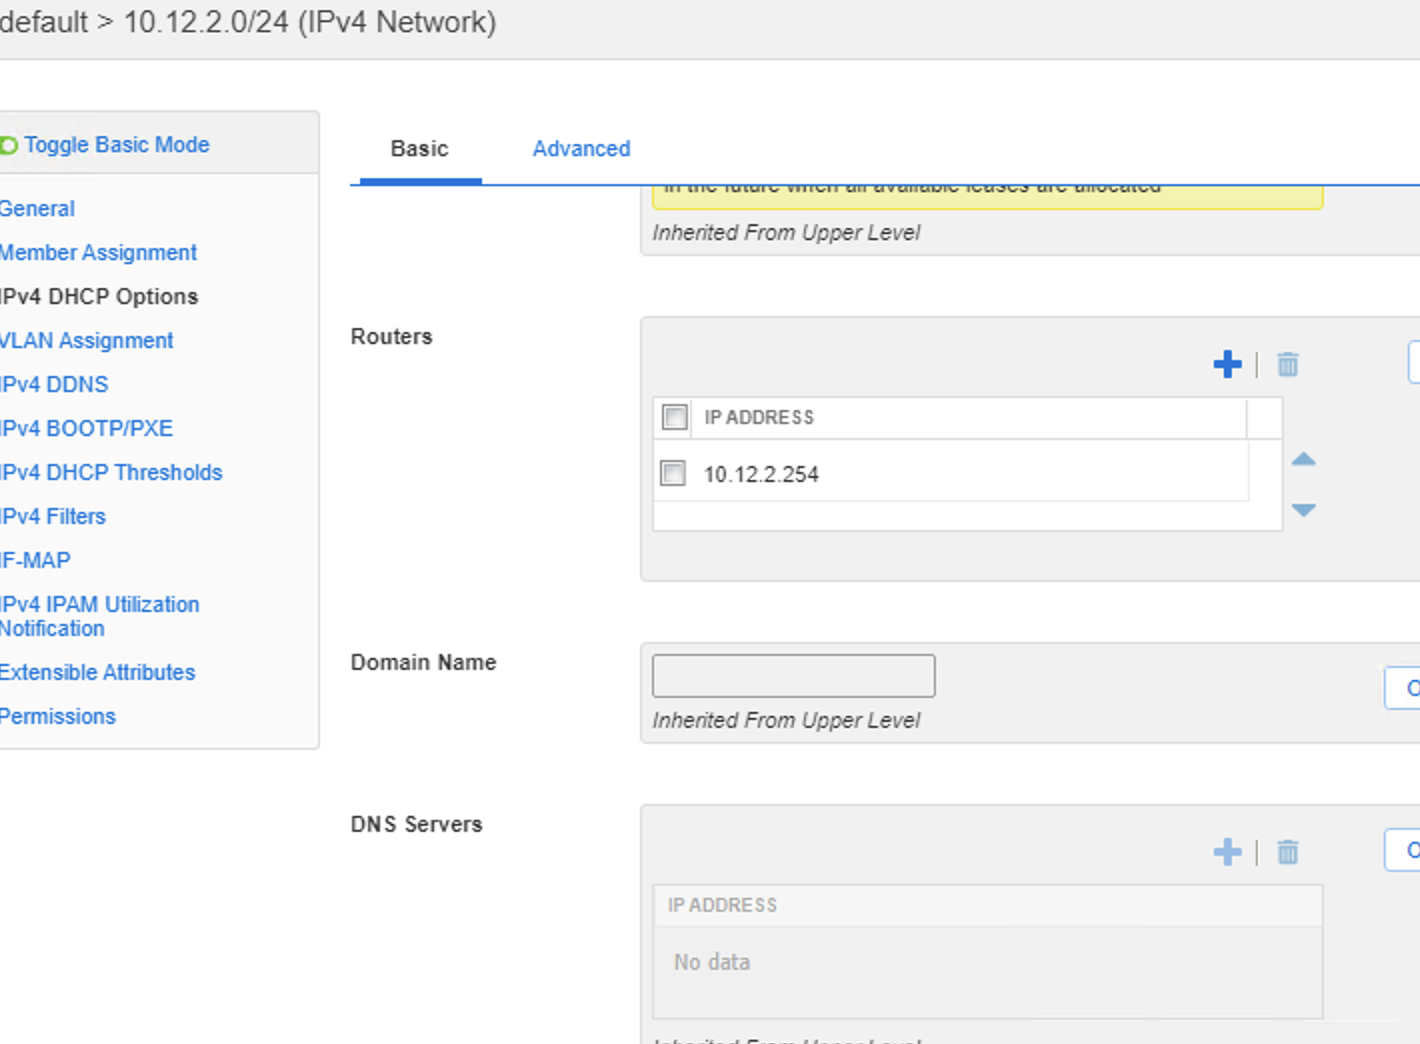
- Import the 10.13.2.0/24 pool into DNAC failed:
DNAC failed to see pool with hosts defined
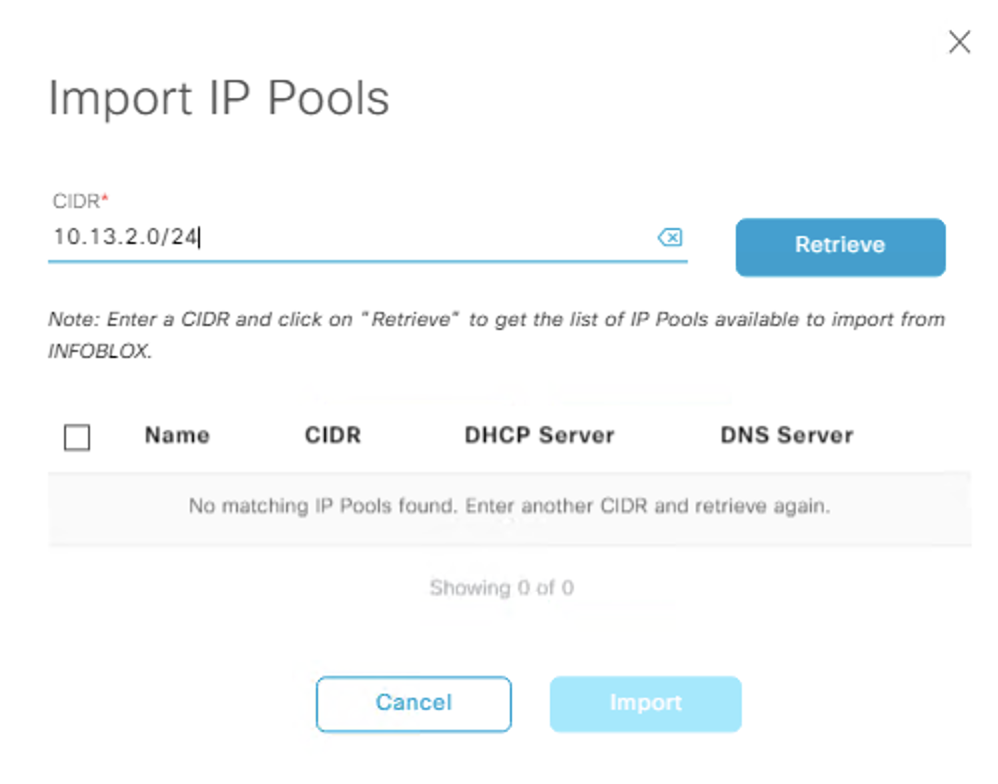
On the IPAM I delete the host record, but it still failed

Then Deleted the fixed address range as well and DNAC can see the pool.
Re-added the host record with a fixed DHCP IP and it failed.
Created fixed hosts that are not bound to DHCP, so just DNS records
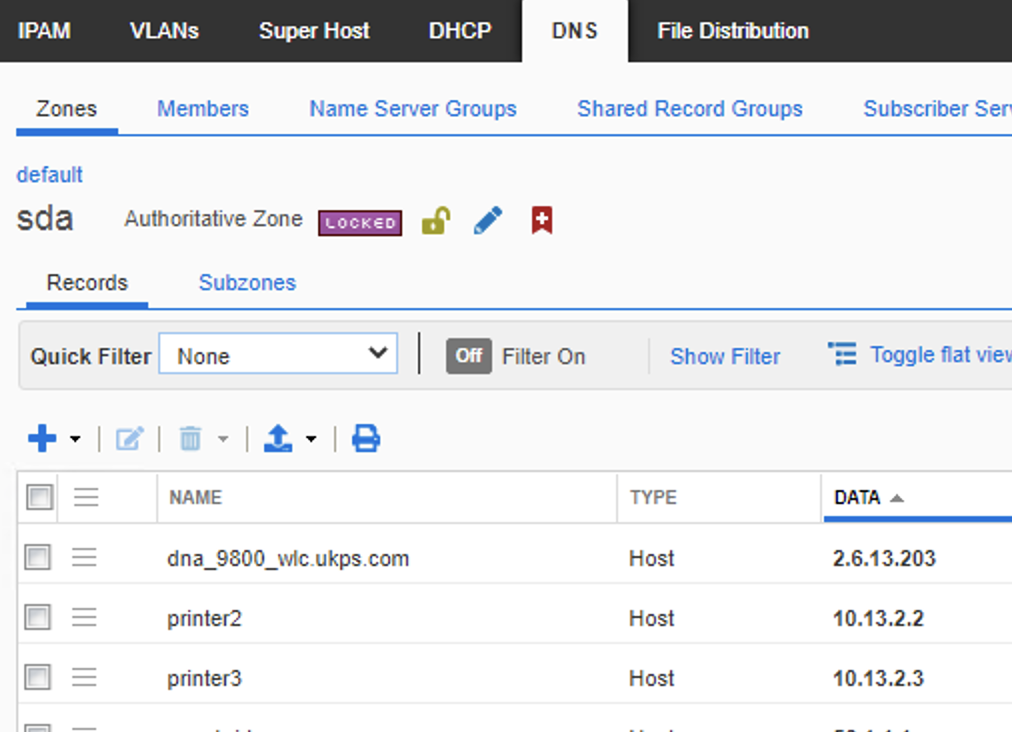
Once i deleted the static DCHP mapping, and DNS entries fro that pool and fixed address range i could pull the pool into DNAC. Only then could i go and add there attributes back to the IP pool.
Even though the pools are no in DNAC< they are at the global level, where to use them we need to assign them to sites, lets do that now.
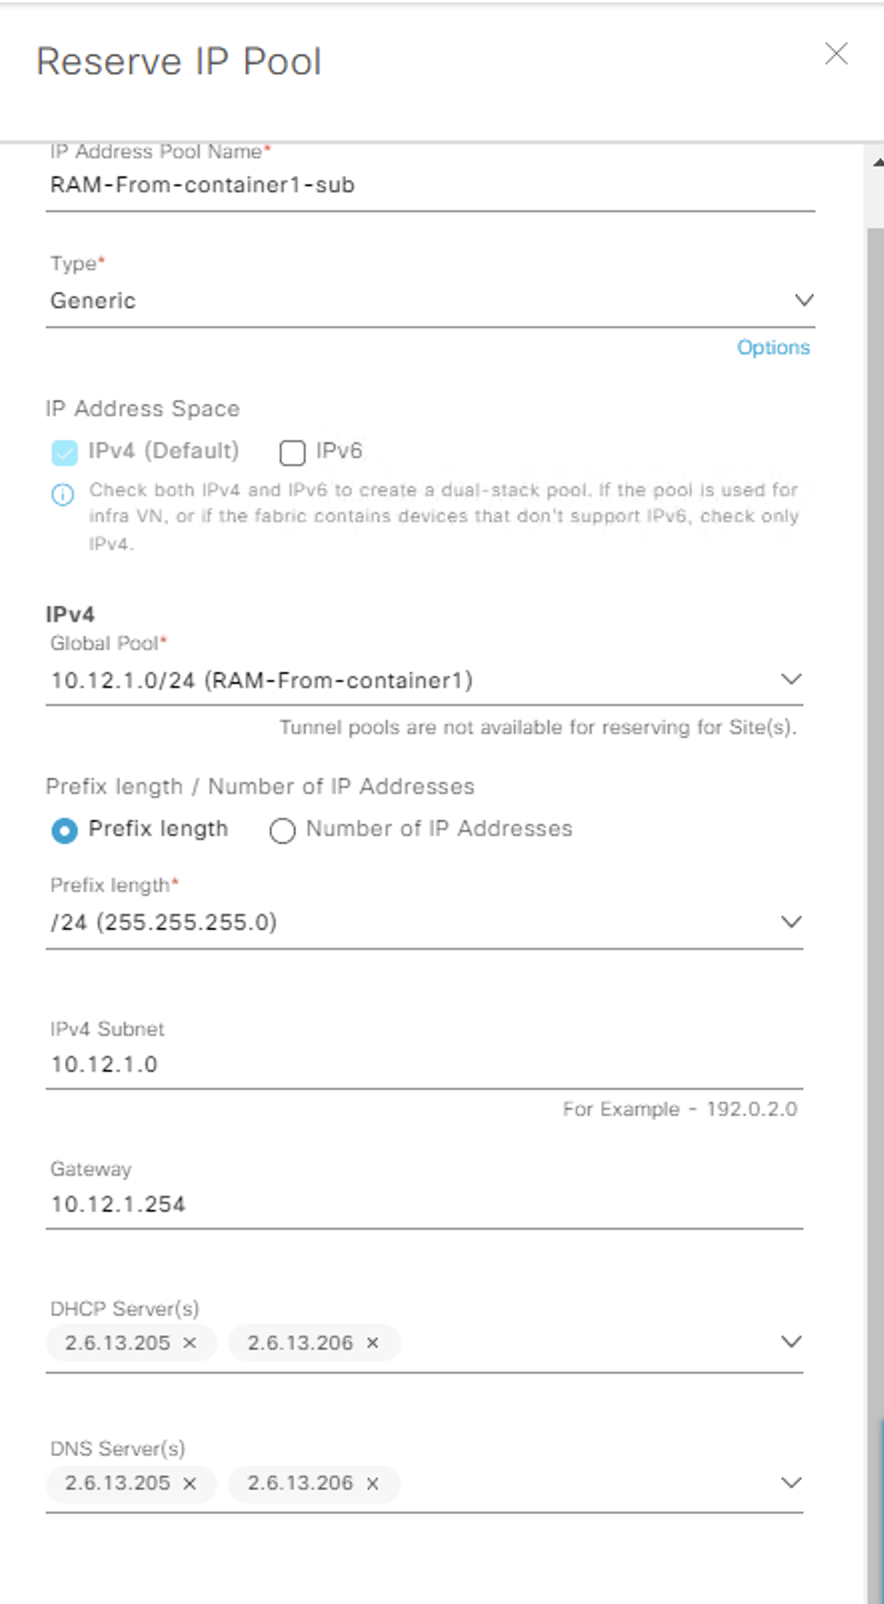
This was a success, we did however need to manually enter all the needed data (gateway IP, DHCP/DNS server) as it wasn’t pulled from the IPAM, nor does DNAC push this data to the IPAM..
Summary
So for these use cases you can define a top level container on the IPAM, create sub-pools with all the pools and options. However when you pull these pools into DNAC they need to come in at the global level and also be mapped 1 to 1 to the site level, which creates a lot of IP Pools. Plus you cannot set any static bindings, DNS records or fixed ranged into the pools before they go into DNAC. Also you still need to define the DHCP/DNS/Gateway addresses for these pools in DNAC.
Deleting pools in DNAC at the site and global level
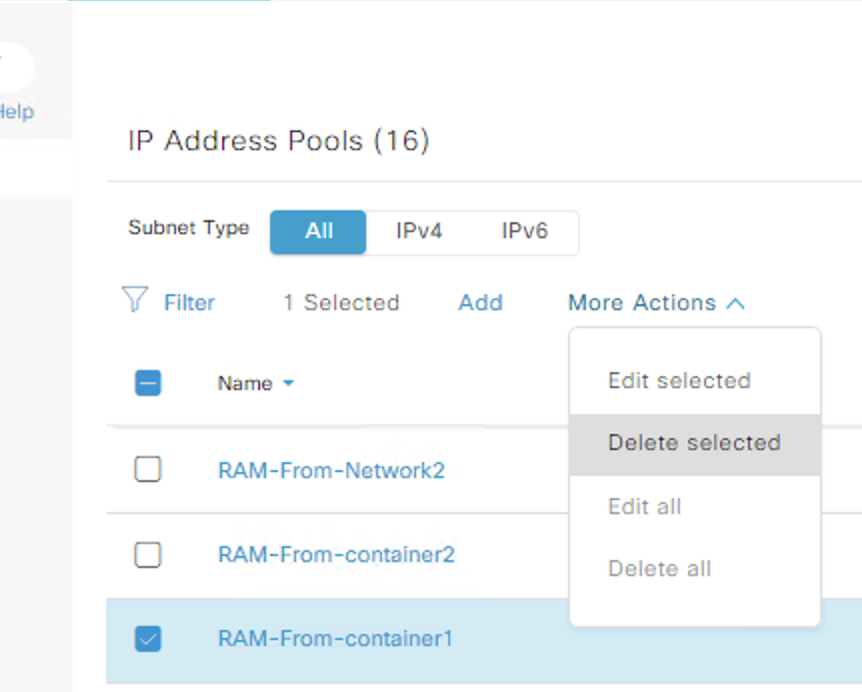
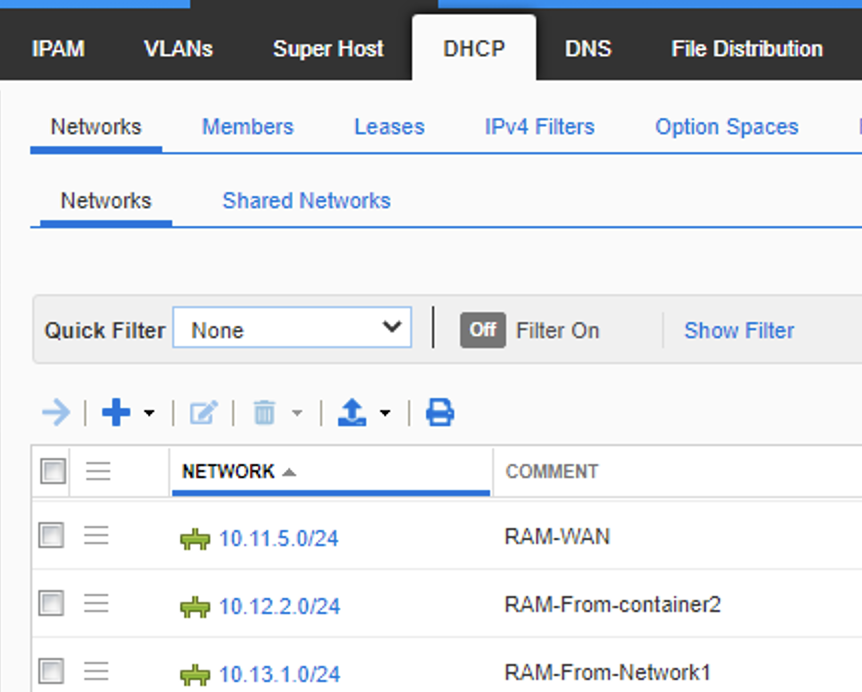
Leading on from where we left the last point, we have a global DNAC pool RAM-From-container1 10.12.1.0/24 thats also in infoblox, this is also fully reserved at the site level Global -> Earth 2.0 -> Virtual_UK in DNAC.
The two test we are going to do are:
- Release at site level
- Delete at global level
Test 1, this has no impact on the IPAM.. The site level pool is release from DNAC, the IPAM is left untouched.
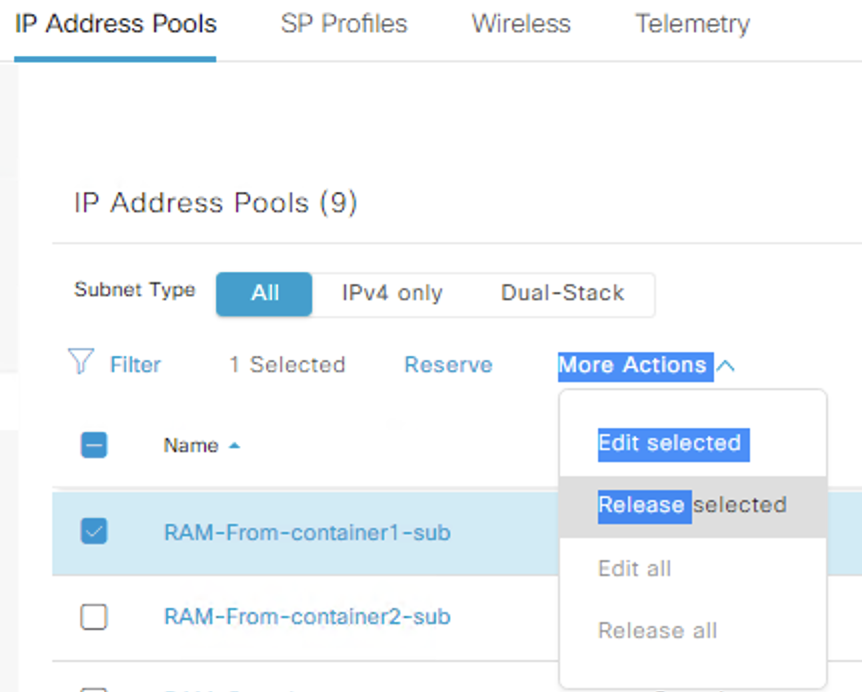
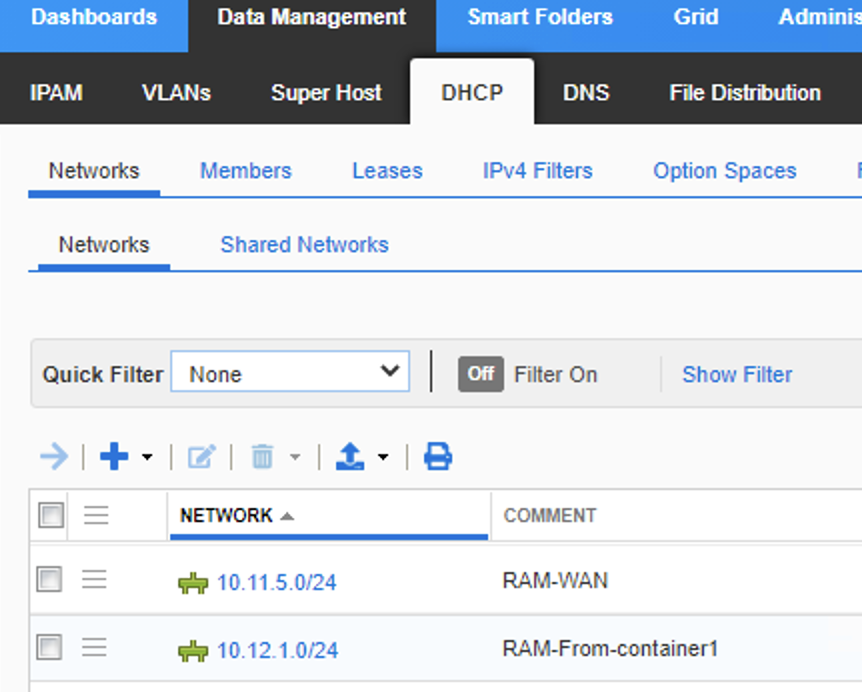
Test 2, this also deleted the pool from the IPAM.
Summary
It’s my opinion the DNAC->Infoblox integration is very limited and seems to add more problems that the few it solves. If you do want to reap the benefits, then that I feel it would be much easier to craft your IP schema in infoblox fully, then only import the required pools into DNAC. Using the API would make this task a bit more seamless, however then you need to manage that functionality somewhere.
This is by no means complete, but hopefully some of these notes will be of value to you, i certainly found this path of discovery interesting.